DIY

Buffalo Check Table Makeover

October 20, 2015

For last couple of years, as soon as the weather gets cooler, I want ALL THE PLAID! I think it’s because I am a child of the 90’s and it feels so right to my grunge beginnings.  But, the fairest of the plaids is definitely black and white buffalo check.  I just can’t get enough of it’s graphic, high contrast pattern.  
So, when I found this little table for $8, I knew it was time to go big with my buffalo check pattern.  

Head over to Curbly today to see the full how-to and all the befores and afters.

Oh and remember the Christmas tree I decorated for just $10 using a lot of black and white buffalo check and gingham.  This isn’t the last of the plaid pattern, you’ll be seeing more soon.

DIY

Mini Rose Gold Pumpkin Planters

October 16, 2015

Spray paint is the best.  It’s an instant makeover in a can.  The last couple of years, my halloween and holiday decor has been a little more on the colorless side, with lots of black and white. Orange pumpkins just won’t do. But, a quick coat of Design Master’s Rose Gold paint, and I’ve got fancy mini pumpkins.

All good parties have a favor, and these cute little Jack O’ Lantern succulent planters are sure to be a hit.  I added simple black paper flags with guest’s names so that these favors could double as place cards as well.

Here’s what you’ll need:

Mini Treat Sized Plastic Pumpkin (available at party supply stores)
little succulents
potting soil
Design Master Rose Gold Spray Paint

This is as easy as it gets. Simply spray paint the entire plastic pumpkin. Design Master Premium Metals paint goes on evenly and these bright orange pumpkins only needed two coats.

When the paint is completely dry, you can plant the succulents in the pumpkin planters. Because of their wide bottoms, be sure to add extra potting soil to the bottom half of the planter and then place the plant.  Pack the soil in around the plant and water them.

Now you can set your table and add little flags with your guest’s names on each one or just a generic “BOO” or “EEK”.  I used some black card stock and a white chalk pen to label my flags.

I buy my Design Master paints and my local Michaels. Design Master paints can paint the most delicate of surfaces, such as silk and fresh flowers, fabric, ribbon, tulle, lace, paper, foam board and Stryrofoam TO the sturdy hard surfaces such as wood, metal, masonry, terra cotta, ceramics and plaster. Design Master is a great resource for products and ideas.  Be sure to check out all the craft and project ideas on their blog.  


This post is sponsored by Design Master. All opinions are my own. Thank you for supporting the brands that make this blog possible. 

etc. / Food & Drink

Caramel Apple Popcorn Balls

October 15, 2015

Halloween is sneaking up on me, and there are so many yummy treats to make. My mom is an amazing cook, baker and party thrower. Growing up, there was no shortage of yummy treats around any holiday. A halloween classic at our house was popcorn balls.  So, I decided I wanted to make these for my kids and their friends this year.  But, I took it one step further and turned these popcorn balls into caramel apples. They are super sweet, but the green apple flavor with creamy caramel is a Fall favorite.
Caramel Apple Popcorn Balls
3 tbsp.
40 large marshmallows
8-10 cups of air popped pop corn
1 package of Green Apple Koolaid (the only place I could find this flavor was Walmart)
1 bag of Kraft Caramels
2 tbsp. water
10 thick pretzel sticks
In a microwave safe bowl, melt the butter on high for 45 seconds.  Add the marshmallows and sprinkle the package of Koolaid all over the marshmallows.  Toss together.  Place back in the microwave and heat on high for 1 min 30 sec.  Stir to combine all the ingredients.  All the popcorn and stir to coat.  
Butter the palms of your hands and shape into balls, pressing then firmly to keep their shape. Place on a parchment lined cookie sheet, because these bad boys are super sticky. While they are still soft, add the pretzel stick to the top.
In a small pot.  Heat the caramels and water on medium high heat until they are melted, stirring often. With a small spoon, spoon on the hot caramel to the top of the popcorn balls and allow the caramel to drizzle down the sides. 
Makes 8-10 popcorn balls.
After the caramel has cooled and hardened, you can package up these sweet, chewy treats to give to friends and family. Tiny Prints is so much more then just cards and invitations, I made these cute BOO stickers with our name on them.  It was hard to pick, because there were so many great Halloween gift tags to choose from.  
I’m going to put together some little treat bags for my kid’s teachers as well.  These little custom stickers will look adorable on little brown paper bags as well.  

This post is sponsored by Tiny Prints.  Thanks for supporting the companies that help make this blog possible. 

DIY

DIY Cement Pumpkin Candle Holders

October 14, 2015

I’ve been playing with cement a lot lately.  It’s fun to experiment with a new material.  I made ‘BOO’ garden stakes and a few ‘&’ symbols for sitting on mantels and such.  And these cute little pumpkin candle holders were so easy to make.

And if you are local friends.  This Saturday’s workshop at my Studio, downtown Bakersfield, is making these spooky chic, candle sticks.  Get your ticket HERE.

Copper is everywhere. And I love that it’s really just an inexpensive material you can pick up at your local hardware store.  I love these with sleek black taper candles for halloween, but for a lighter airier look, they also look great with white candles.

Ok, here’s what you’ll need.

  • quick dry cement
  • plastic container for mixing the cement in
  • plastic spoons
  • gloves
  • mini plastic jack o lanterns (I found these at the party store)
  • 1″ copper fitting (found in the plumbing section at the hardware store)
  • x-acto or pocket knife
  • needle nose pliers

Start by mixing a small amount of cement in your plastic container.  This Rapid Set dries extremely quickly, so you have to work fast.  Mix 4 parts cement to 1 part water, like a thick milkshake consistency.

Remove the handle from the plastic pumpkin and fill the pumpkins with cement by the spoonful. 

When the pumpkin is full, tap it firmly to remove any air bubbles.

Next, insert the copper fitting piece into the center of the cement.  Press it down so that half of the copper is in the cement and half is out.  Make sure that it is sitting straight in the cement, you don’t want your candles leaning one direction.

Allow the cement to set for at least 15-20 mins. Then using a knife or x-acto, cut a small slit in the top of the plastic pumpkin.

Then using the pliers, peel away the plastic from the cement.

Allow the cement to cure completely over night and then place pretty taper candles in each little pumpkin.

DIY

Bold Patterned Modern Quilt

October 13, 2015

I’ve been itching to make a quilt for a while now.  And when I saw this rug at Anthropologie, I knew the pattern would work well as a quilt.  I tested out the pattern with a simple wall art piece using colored triangles cut out of card stock.  
Over the years, I’ve made quilts for all my brothers, Joel, Joash, and Josh and one for my dad.  I decided it was about time I made one for my hubby.  So, this quilt is for Lonnie.  
You can see all the pictures, instructions and pattern over on eHow today. This really was much easier to make then it appears. It’s all straight line sewing.  My mother in law was in town last week, so we worked as a team to get this made in a couple of days. I sewed and she cut squares and triangles and ironed seams open. I’m so grateful for her help. I haven’t decided where it’s going to go yet, but instead of just making a throw size, I went big and made this to fit a queen sized bed. So, maybe it will go on our bed or even just hang on a wall as a graphic bold statement. 

Here’s a few other simple quilts I’ve made: Pairs in Squares, Chevron Baby Quilt, Hawaiian Quilt, and Whale Quilt.

Food & Drink

Chocolate Orange Drop Cookies

October 6, 2015

Well, this weekend our temperatures finally dropped a bit and I quickly turned on the oven and did a little baking. I’m sure it won’t last, but I’m loving the 70 and 80 F weather so much. Maybe Fall is coming. I’m tired of wearing shorts, I’m ready to wear jeans, sweater and boots.  
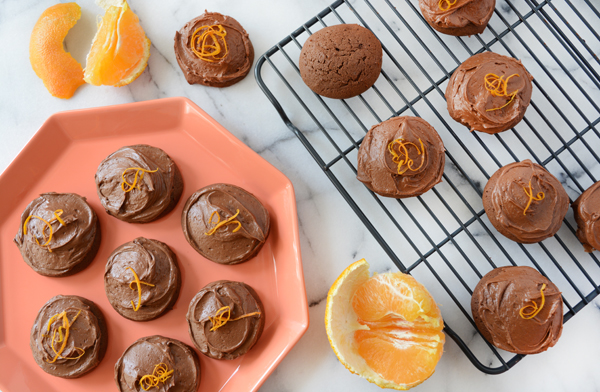
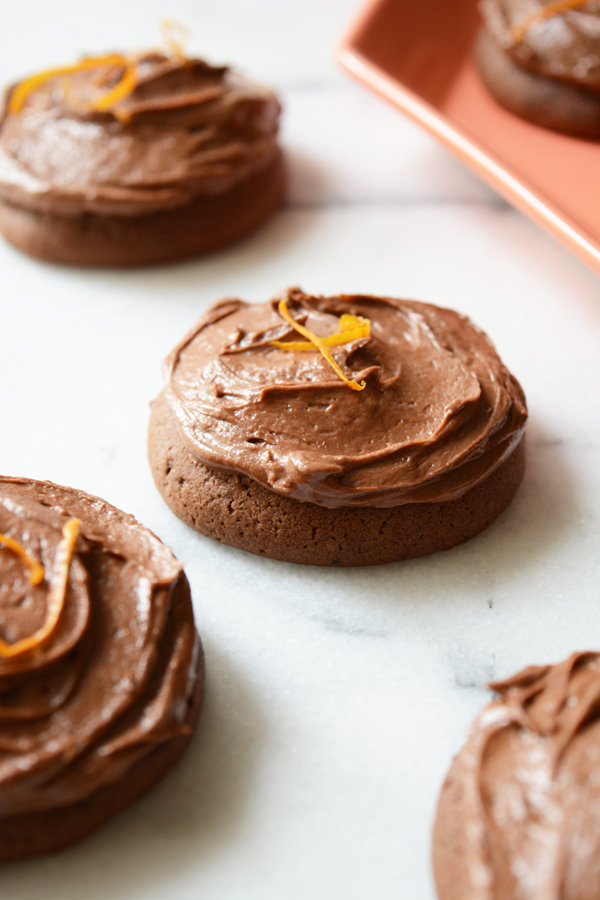
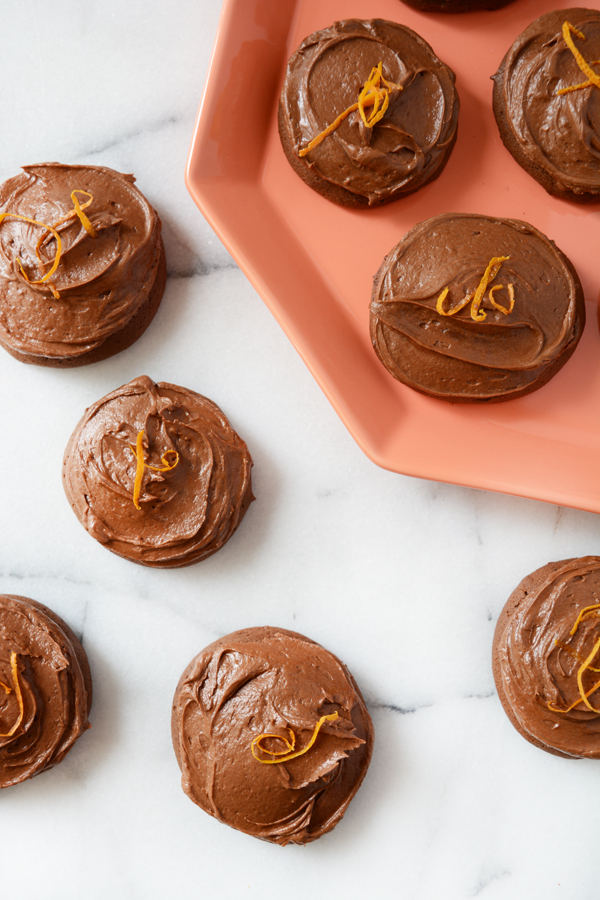
There are some flavors that I just meant to be together, chocolate and orange are a match made in heaven.  These, easy to make, soft cookies have just about as much frosting as cookie.  Too pretty to stack in a cookie jar, these cookies are fancy enough to be served as dessert at your next dinner party.

Chocolate Orange Drop Cookies

2/3 cup butter
1 cup sugar
1/3 cup buttermilk
1 tsp. vanilla
1 egg
zest of one orange
1/2 cup cocoa
1/ 3/4 cup flour
1/2 tsp. salt
1/2 tsp. baking soda

In a mixing bowl beat the sugar and butter together.  Add the buttermilk, vanilla, egg and orange zest, beat again. In another bowl combine the dry ingredients (flour, salt baking soda and cocoa). Whisk together to make sure there are no lumps and then the ingredients are combined.  Add the dry ingredients to the butter and sugar mixture.  Mix until the batter is smooth.

Using a small ice cream scoop or a tbsp. place small scoops of batter on a parchment lined baking sheet.  Bake at 400 F for just 8-10 mins.  You want these cookies to be soft.  Cool on a wire rack.
When they are completely cool, frost each cookie with a generous amount of chocolate orange frosting (see recipe below) and sprinkle a little more orange zest on each cookie.

Chocolate Orange Frosting

Zest of one orange (save some of the zest to garnish the cookies)
3 tbsp. orange juice
1/2 cup cocoa
2 tbsp. butter
2 cups powdered sugar

Combine all ingredients in a bowl and beat well with an electric mixture until the frosting is smooth.

This recipe is adapted from a Betty Crocker’s Chocolate Drop Cookies recipe.  I bought one of those little recipe books at the grocery store with this recipe in it when we first got married.  It’s been a favorite recipe around here for a while now.

Design / DIY / etc.

The Home Depot Halloween Style Challenge

October 2, 2015

I’m really excited for you to see our living room all decorated for Halloween.  I took on The Home Depot Style Challenge and gave our living room a simple black and white halloween makeover. It’s just an itty bitty bit spooky. I’ve also got a couple easy DIYs for you, like a pretty walnut cheese board and some creepy eyes for your plants.  It’s clean and modern, so you don’t feel like you are living in a haunted mansion.  
Head over to The Home Depot Blog to see all the details.

DIY

DIY Cement Garden Stakes

September 30, 2015

I’ve been having a lot of with cement lately.  It’s such a fun, versatile material to work with.  I love the industrial and rustic vibe that it gives to space. There’s nothing stuffy or uptight about cement.
Be sure to head over to Curbly today to check out how I made these fun B-O-O garden stakes with cement and some copper pipe just in time for Halloween.  

Food & Drink

Orange Cardamom Cooler

September 29, 2015

If you were to search cardamom on my blog, I think it would come up often. It is one of my favorite flavors, and orange and cardamom together are pretty much perfect.  
I recently found some black sugar and wanted to create a fun Halloween themed drink for my family. I’m having fun with this new mocktail series, be sure to check out the other drink recipes I’ve created, like the Pineapple Rosemary Spritzer or the Blackberry Ginger Cooler.
Orange Cardamom Cooler

2 cups orange juice
1 tsp. ground cardamom
Orange Soda ( I love Izzy Sparkly Clementine Soda, it’s made with juice and not a bunch of sugar)
black sugar
Combine the orange juice and cardamom in a small pot. Bring to a boil and then remove from the heat. Chill until ready to serve. 
Rub the rim of the glass with orange juice and dip in black sugar.  Fill the glass with ice and 1 part orange juice to 1 part soda.
Makes 4 drinks.