If you’ve done any home improvement, you’ll totally get where I’m coming. Once you update or tackle one room, you just get the urge to move onto another. Since I gave our living room a more modern look, I’m itching to make changing all over our house now. The next room on my list is our dining room, probably because it’s adjoining the living room.
I like the wall color, a dark charcoal grey, I think it’s a good contrast to the bright white living room. And I love how the rich wall color makes the trim and built in china cabinets pop. I think dining rooms are a great place to try darker wall colors. This room is really pretty basic, the only furniture is the large square dining room table and a little cabinet to hold our computer. We’ve had the table and chairs for 10 years now. It’s a great size and shape for our room, but the style is probably not what I would choose now. It’s a little more French country then I’d like it to be, it’s probably those turned legs. But, like the living room, new furniture is not in the budget right now. So, I think a great graphic rug would really give this space to a more modern tone.
So, here’s my problem, how do you find a square rug for a square table and room? FLOR of course! I’ve gotten their beautiful catalogues for years and have dreamed of a fabulous, totally customizable rug for our home. FLOR is an innovative system of carpet squares that you assemble to create custom rugs, runners, or wall-to-wall designs of any shape or color. So, a square area rug is no problem at all with FLOR.
But, how do you decide? They have soooo many amazing colors and patterns to choose from. I NEED YOUR HELP! I’m drawn to the graphic patterns and as much as I love color (especially green), when it comes to bigger pieces, I like to keep things a little more neutral. Color can always be added in the accessories. Take a look at the 6 patterns that are at the top of my faves list. Now tell me which one I should choose and why. I’m really serious, please leave me a comment, I need your advice.
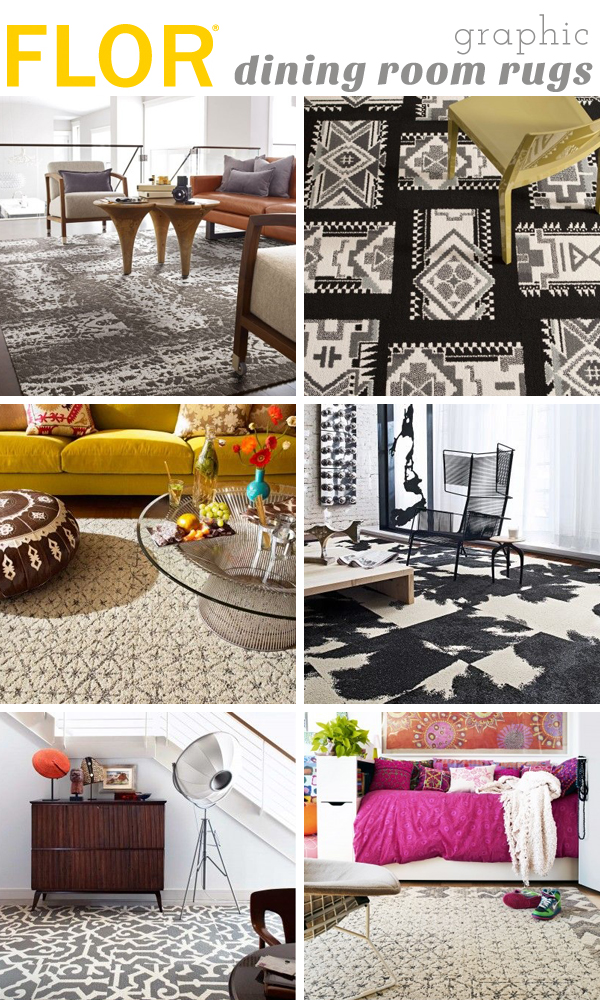
Here’s some of my thoughts on these rugs. I LOVE them all, but I’m trying to identify their pros and cons. I think the most classic and formal rug is probably the Lasting Grateness, but maybe I want to be a little more edgy. Then the edgiest or most trendy is probably the Craft Work. It’s so right now and fabulous, but will I love it in 2 years? I surprised myself with the Mod Cow, it is also trendy, but also kind of a classic. I’m drawn to it’s big, bold, black and white graphic pattern. The Hide & Batik is so lovely and organic and it’s also the one Lonnie liked best out of all of these, but there is also none that he dislikes either. The Hide & Batik is also a look a haven’t seen anywhere else, definitely unique. And then last, but definitely not least, Vintage Vibe. I think it’s my fave, but it’s also very similar to my living room rug. I love that it is soft and cozy looking. It’s not stuffy or too fancy because, even though I have china dishes, we are neither stuffy nor fancy.
You can see I am getting nowhere in this decision making. I’m usually a very decisive person and know what I love. But FLOR just has too many amazing chooses. Your turn, which one and why………