etc.

Go Explore, Adventure Awaits Free Printable

September 10, 2014

I’ve got a little free printable for you today. I framed this little piece for my the global backpacker bedroom and sat it on the bedside table. I’m itching for some adventure. I want to go somewhere, move somewhere, do something different.  I don’t know what that looks like yet, but I want to explore. Maybe I just need to go backpacking this weekend. But, it feels bigger, like I want a real change from our normal life right now. Maybe it’s just because I’ve been stuck at this computer doing a lot of homework lately, I don’t know. Do you ever feel that way? I think I like change, I definitely like adventure and the unknown.

I took this picture at Lassen Volcanic National Park last year with just my iphone.  The sky was so incredibly blue and I can almost taste the crisp, clean air.

The print is 5×7″. So you can trim it to that size and frame it in a 5×7″ frame. Or leave it with the white boarder and frame it as a 8×10″ or hang it on an old wooden hanger like I did.  I just used my home printer, but it might be nice to have this printed on some photo paper at a professional lab.  

Click HERE to download and print a copy for yourself.

Design / etc.

How to Put Together Perfect Pillow Combinations

September 5, 2014

I have a pillow problem, well that’s what my husband calls it. But, they’re are such a great way to add and little color and pattern to a space. You just can’t have too many, right?  
Pillows are a great way to break free of the matchy matchy sets of furniture and decorating of the past.  But, with so many choices out there, it can be hard to put a perfect pillow combination together. I recently discovered that Tiny Prints has AMAZING pillows that can be personalized with monograms, initials, names, dates and even photographs. The Happy Home pillow needed to be on my couch.  My pillow choices can sometimes look random, but here’s how I usually put them together. I’m basing this on groups of 3, because odd numbers in design are so much better. So, here’s what you need to look for when grouping pillows. 
1. A solid (or something very close to that).
2. A large scaled pattern.
3. A small scaled pattern.
And as far as color goes, pick one accent color.  That color should show up in each of the three pillows (unless the other pillows are completely neutrals – black, grey, white, tan, or brown).  So, if you look at my examples, in the first combo, green is the accent and the other two are neutrals.  In the second combo, gold/yellow is the accent color. And in the third combo, coral is the accent.  Other colors can appear in the pillows, but there needs to be one color that ties them together.  
I’m sure there are a lot of formulas that designers have put together before, but this usually works for me and seems like a plan others could try as well.  
1 + 2 + 3
1 + 2 + 3
1 + 2 + 3

I hope this makes sense. To clarify a little further (not because you’re not smart), but because I might be stretching my own rules a bit, here’s what I consider a solid, small pattern and large pattern in the combos above.

Solid + Large Pattern + Small Pattern
Small Pattern + Large Pattern + Solid
Large Pattern + Solid + Small Pattern
The beauty of this formula is you can take any pillow away and it still works.  Try it, take one of the pillows away from one of the combos and the pair remaining still look fabulous together. You can add more to the mix as well and you should be golden.  

etc.

Thrifting Thursday – Finds for the Global Backpacker Bedroom

September 4, 2014

For today’s Thrifting Thursday, I’m sharing some of the thrifted treasures that I found for the Global Backpacker Bedroom.  I want you to see that decorating and designing a space doesn’t have to cost a fortune. Some of the best pieces in this room cost less then $5. With a little hunting and a love for the quirky and sometimes weird, you can give your home a unique look.
This little train cost less then $3.  I gave it a quick spray with some flat white paint and filled it with some nice succulents.  

I bought the vintage Hudson Bay blanket at the Pasadena Flea Market.  I paid $50 for it and $40 to have it dry cleaned.  The nightstand cost my $8 and I left the drawer and top it’s original wood finish and painted the rest a glossy black.  I found the backpack at a thrift store for $5 and a vintage boy scout book for a buck or two.  

My brother, Joash, found this other backpack, I’m sure he only paid a dime for it.  The two antique folding chairs where bought by my parents at an antique store in Northern Cal.  And the desk/table was made by Joash with ALL found materials and objects.  The top is an old redwood diving board, how cool? 

The paint by number, has appeared on Thrifting Thursday before.  I paid only $2.84 for this gorgeous piece.  The Yosemite pendant I paid a whole $10 for, but it was sooo worth it, right? 

What have you scored lately?  Are you finding your treasures at thrift stores, garage sales or craigslist?  

Design / etc.

Global Backpacker Bedroom Reveal

Ok, this is truly one of my favorite spaces. I would happily move into my nephew’s new big boy bedroom (and I do when I’m in town because it doubles as a guest room).  This almost 4 year old’s room is all boy, but not a toddler space. I think this will be a room that he can grow up in.  It’s a mix of old and new and has just the right amount of color and pattern.  I spoke to my brother and sister-in-law about the look they were going for and we decided that the space would be outdoorsy, adventurous and global.  It’s really a room that embodies my brother Josh and his adventurous life and spirit.  
Remember this inspiration board for a Global Backpacker Big Boy Bedroom.   I know, it was a long time ago that I posted this.  Warning: I might start rambling here, feel free to skip over this and just look at the pics. And really, the room has been done for quite awhile, I’ve just been stuck on taking the plunge to share this project. It’s weird, I’m really proud of this space, but I’ve been anxious about weeding through the pictures and sharing the finished product. It’s been on my to-do list every week for months and I keep leaving it there. I don’t know why I’m sharing this. But, I am frustrated with myself lately. I’ve had a lot on my plate, and as a result I’ve been very absent with my blog, and I really love this part of my life (blogging). I don’t want to be like this, I just have trouble sharing posts that I think are less then perfect (that’s pretty much everything on this blog). The truth is, I’m not a photographer, even though I have to take pictures for my blog almost daily. I’m self conscience of the quality of my images. I know this room looks good in person, but I want it to translate to your computer screen the same way. I just don’t do anything half-hearted, and therefore as a result, sometimes I put off and put off things. I don’t know if this makes sense or if you care to hear my ramblings. I just want to share a little bit more about this one-man-show. But, I do love to take risks, so here’s my little risk for today, I’m finally sharing the room I designed for my nephew. I hope you like it as much as I do, and if you don’t, that’s ok. 

Over the next week or so I’ll share more of the details and resources for this space. So, today just browse through the many pics and feel free to ask questions and I’ll try to answer them all in the posts to follow.  
The little grouping of art over the dresser is one of my favorites. I love to put smaller prints and pictures together to make a statement as one piece. The awesome Minted art (Bear and Mountains) were the starting place for this grouping. I love that you can buy their gorgeous prints framed and ready to hang. And white mattes and white frames are so crisp and clean. 
The huge black world map decal from Wallums, is perfect in this space. The black map looks so sharp with all the black furniture. I’ll be telling you more about this piece. It was so easy to put up and the results are so dramatic. 
And let’s be honest, I can’t really love a room with out a little Land of Nod here and there. Nod products work so well with vintage and thrifted pieces. The red library cart, the adventure art, the plaid storage cubes, the first aid box, the chevron pouf, the bear pillow, the & storage bin, the black and white striped sheets, and the D for Discover pillow were better then perfect for this space.  
I also made a couple pillows to throw into the mix. Logan is named after a Mountain in Canada, so the mountain was a must and the blue camping fabric had to make it’s way into the room somehow.  Canoes and canteens, come on now.  

Now, I’m sure I’ve said favorite already, but the little desk really is the highlight of the room and the kid’s favorite spot. My talented brother, Joash, made this desk out of all found and reclaimed supplies.  It’s a gorgeous piece, that’s unique and perfect for little kiddos to play and color at.  This was truly a custom piece.  My parents got all the grandkids these sweet little antique folding chairs a couple Christmases ago, so I asked Joash to make a table that would fit the chairs perfectly and sit right under the window in this room.  The top of the table is an old redwood diving board. Joash sanded it just enough to reveal the beautiful grain, but also left hint of the painted surface. He made this entire piece without any nails or screws, it’s all doweled together. The legs he found somewhere, along with the filing cabinets and cubbies that he added the center of the table.  

I used the same sheets on both the top and bottom bunks, but used different blankets. The bottom bed sports a vintage Hudson Bay blanket (that I bought for my brother for Christmas a couple years ago at the Pasadena Flea Market) and the top bed I gave a splash of color with a yellowy-mustard quilt from Target

I refinished a little mid century nightstand by leaving some of the original wood on the drawer and top and painted the rest a high gloss black. Then I made a really simple black shelf with some very inexpensive supplies and hung a vintage backpack under the shelf for stuffed animal storage.  
Keep checking back, I’ll have more details about the room in coming posts. And if you want the sources for anything you see in the space, please just ask.  

etc. / Style

My Mini Nerd

August 29, 2014

I’ve told you before that I married a nerd. I highly recommend it, he’s loyal, level headed and is always thinking about something interesting. Well, as a result of marrying a nerd I also gave birth to a mini one.  Meet Dylan Robert. Olivia, my 2 year old, dominates my instagram feed, because she’s with me all day long and she’s pretty darn cute. But, I want you to know about my other amazing kids as well.  I introduced you to Denali a couple months ago.

Dylan is my middle child and our only boy. He is a nerd. He’s smart and very curious about life and how things work. He’s in GATE school and takes it very seriously. He’s also my sweetest, most thoughtful kid. He usually hugs us 2 or 3 times before he goes to bed. He’s a bit of a clean freak and keeps a pretty organized, neat room (for an 11 year old).  He LOVES lego. Since he was 3 years old, he’s probably spent a couple hours a day building and creating things (mostly Star Wars type space ships) with Lego. He’s very generous and he loves his sisters. He asks lots of questions. And his personality is most like mine. He is passionate about perfection and is very diligent.  He doesn’t do half-hearted and he’s a great artist.  This kid is going to go places, I know it.

We got Dyl ready for back-to-school with a little shopping at P.S. from Aeropostle. I made my life a little easier and did all his shopping online.  With a couple pairs of skinny jeans, I great pair of black high tops and two new shirts, he’s set for Fall.

Thanks P.S. from Aeropostle for providing Dylan’s wardrobe. 

etc.

3 West Elm Looks for Less

August 25, 2014

Who doesn’t love West Elm? I sure do, I’ve been drooling over their catalogues for at least 8 years now. And I love when I get a chance to visit a store. So much inspiration in one spot. This company is spot one and they are the trend setter. And while their prices are great, I know you are going to want these 3 West Elm looks that you can get for a lot less.

At West Elm for $79.00
At Hobby Lobby for $11.99 for the glass and $1.50 for the wood base. (and definitely use a coupon to save more)
At West Elm for $14.00
At Michaels for $2.99 (or even less with a 40% off coupon)
At West Elm for $49.00
At Homegoods for $19.99
Not bad, huh? You can have the look you love at a fraction of the price. If you like this series, I’ll try to find more looks for less for you. It’s what I do best. I’m a sucker for a good deal. And I really do believe you can have a great looking home for very little money.

I did the Math. If you went to West Elm and bought all 3 of these items, you’d spend $142.  And if you shopped the look for less, you’d spend $36.47 (that’s without coupons).  That’s a savings of $105.53. WOW!!! I just impressed myself.  

etc.

Back to School Doodle Art

This shop is part of a social shopper marketing insight campaign with Pollinate Media Group® and Office Depot, but all my opinions are my own. #pmedia #inspirestudents http://my-disclosur.es/OBsstV

Happy Monday morning. Well, we are ready for our second week of school. I always have mixed feelings this time of year. For many years, back-to-school meant I was meeting a new class and starting a brand new year of teaching for me.  For now, I’m blessed to be home with Olivia while she is little and pursue my dreams of trying out a creative career through blogging.  I’m still a teacher at heart, so a little teacherish apple art is fun to make and give to special teacher and then also load them up with a bunch of great school supplies.

This little Back to School Doodle Art was a lot of fun to make. And something your kids would enjoy making as well. I started with a 12×12″ piece of card stock.  Using the thicker markers first, I begin making lines both vertically and horizontally.

Then I started adding thinner lines and rows of  dots with the finer point markers.  Working from the center out, I created a very lose apple shape. And to make it a real art piece, I put it in a 12×12″ frame.  

This year I loaded up on Office Depot.  They have all the brands I love and right now they have a great deal on select Newell Rubbermaid (Sharpie, Mr. Sketch, PaperMate, Expo Neon Window Markers, and Uni-Ball) products, if you spend $20 you get $5 off and they always have great weekly deals (this week: select PaperMate Flair 4pk’s are $4, Sharpie 12ct Asst. Fine and Ultra Fine Asst are $6 and Sharpie Dozen Box Black Fine and Ultra Fine are just $6 while supplies last). And if you sign of for the Office Depot Rewards program, there is even more savings in available.

Design / etc.

Industrial Dining Room Chandeliers

August 22, 2014

Now that I have a new table, I feel like a few other things in this room that need updating.  The chandelier is number one.  I think they are really important to a dining room.  It’s a chance to make a statement and this is one room that I feel can be a little more formal in.  Because the chandelier is the only light source in the room, I think it needs to be one with quite a few bulbs.  The one we currently have, I bought for about $30 and installed it about ten years ago.  It replaced an ugly white ceiling fan.  We’ve definitely gotten our money out of it and a change would be nice.

Because I live in a 1920s house with gorgeous original built-ins and have a mid century table I think an industrial style light fixture might be just the balance I’m looking for.  Lamps Plus has some amazing options in this industrial style.

I’ve picked a few of my favorites and would love your input.  Which one do you think would be best in my space?  I love anything with edison bulbs, can you tell?

1 // 2 
3
4 // 5
6

DIY / etc.

DIY Painted Pineapple Tote Bag

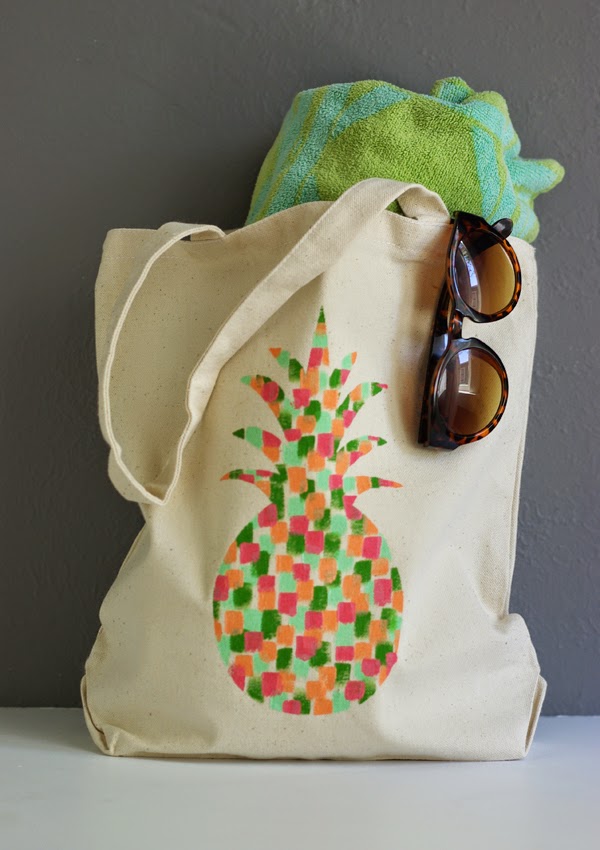
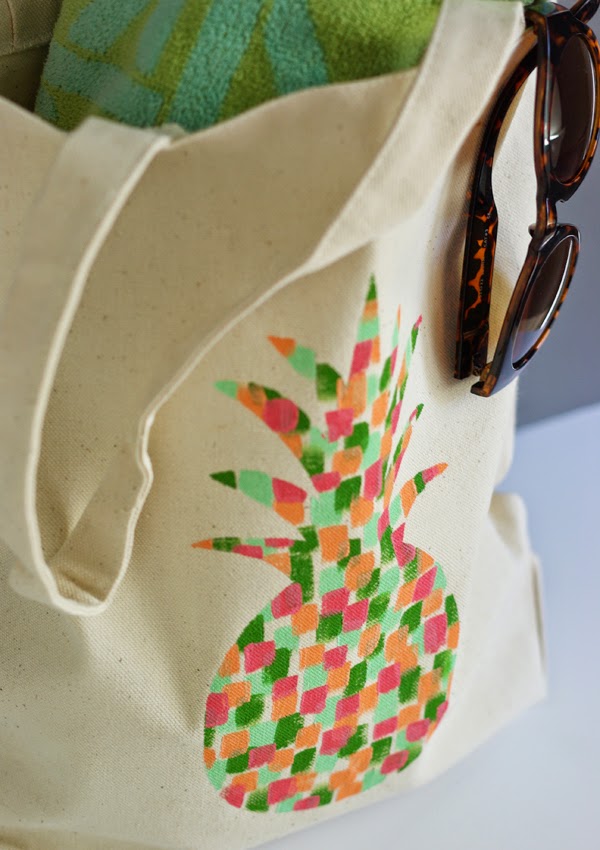
I’m not done with pineapples yet.  I loved them last Summer, I still love them this Summer and I hope they stick around for next year.

I’ve taken my simple DIY Painted Pineapple Print and turned it into a little tote bag.  My Cricut Explore Air™ machine made it super easy to cut a freezer paper stencil of a pineapple out.

I participating in the Cricut Design Space Star challenge. This month’s them is Fashion and Gear. So, if for some super lucky chance I make it to the top 10, you guys gotta help me out by voting for my bag.

So, here’s how I did it.  First I logged into my Cricut Design Space account and started a new project with a simple 12×12 mat.  I inserted my favorite pineapple image, it’s from the cartridge called Serenade.  The great thing about Design Space is that you don’t have to buy the whole cartridge anymore, you can just buy one image.  Ok, so once I have the image big enough on the mat I simply hit cut.  You will be see a preview of the cutting mat and the pineapple will be in the top left hand corner of the mat.  Click and drag the image over to the center of the mat.

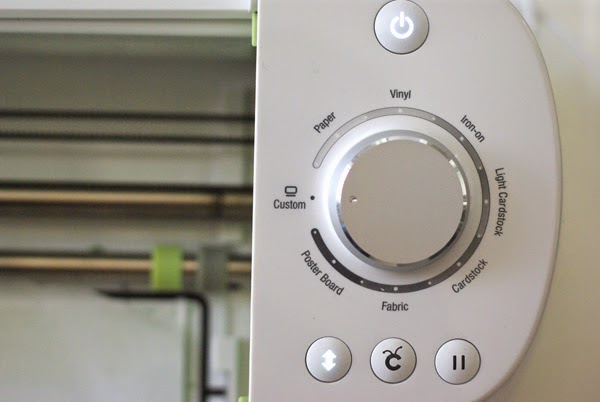
Place a 12×12″ piece of freezer paper on the cutting mat, shiny side down.  Load the mat, turn the dial to custom and then on the custom pull down menu select vellum (that’s the closest material to freezer paper and it works perfectly).  And then hit GO!  In a matter of seconds, you’ll have a beautifully cut stencil.

With your iron set to no steam, iron on the stencil, shiny side down in the center of your bag.  I bought this simple canvas bag at Hobby Lobby for just $2.99.  
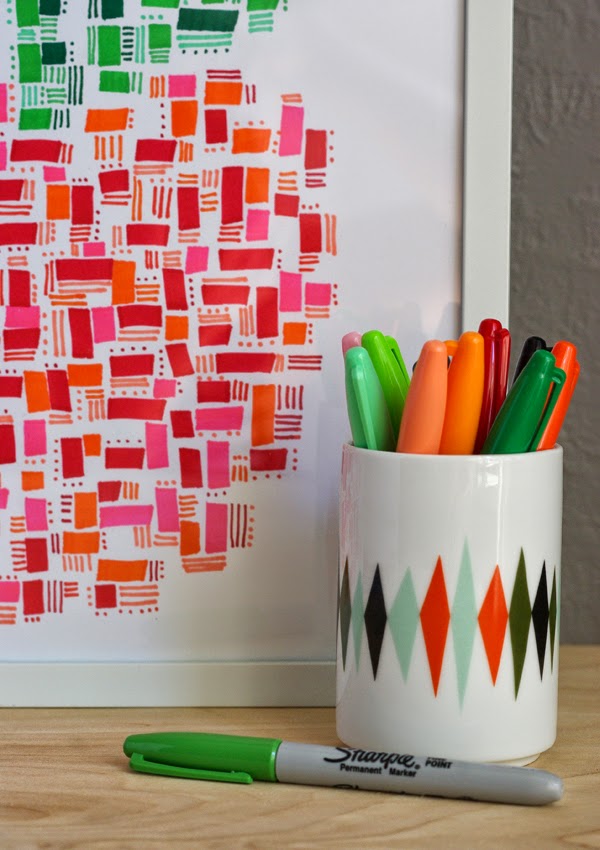
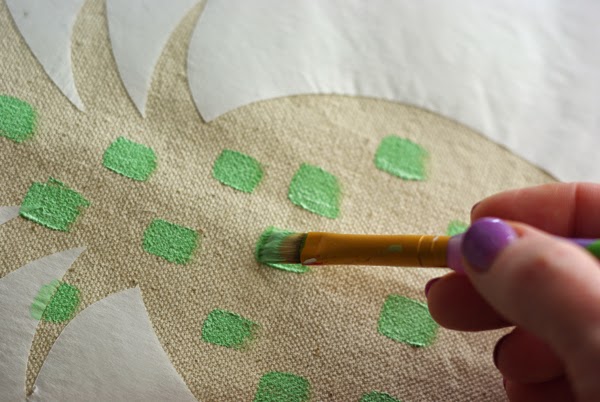
Now the fun begins, select a few bright colored craft paints, I used for for my bag.  I use Martha Stewarts paints, if they are heat set with an iron, you can wash them.  
Applying one color at a time, make small brush strokes in one direction over the entire pineapple shape.
Try to evenly space each color, overlapping them some.
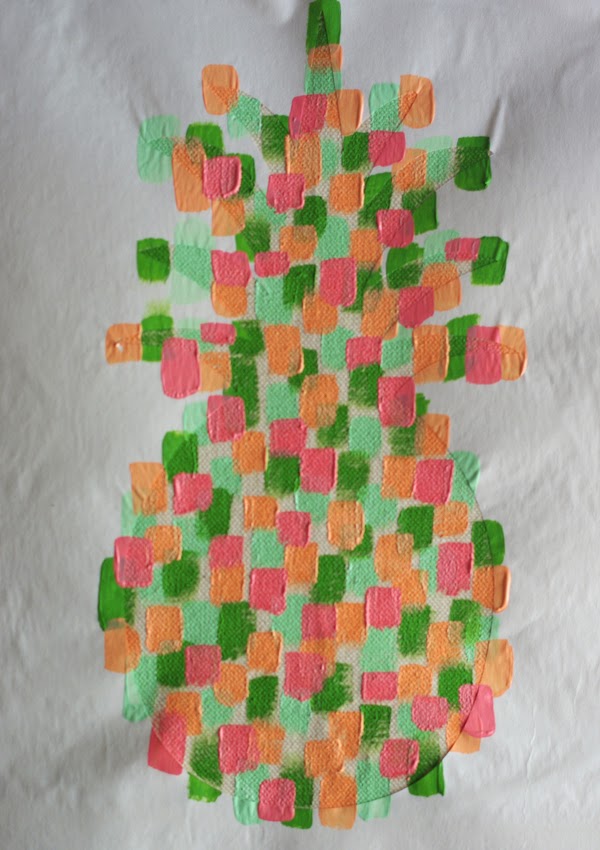
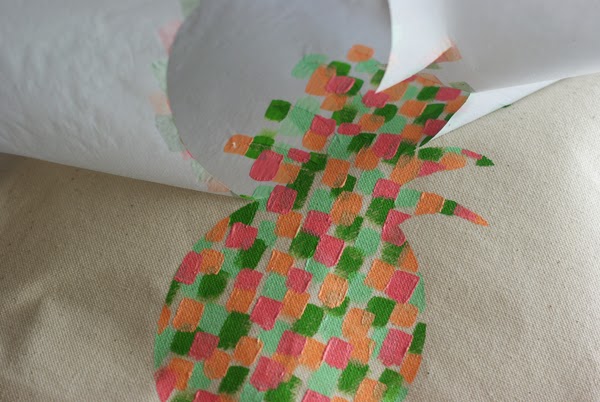
Allow the paint to dry completely and then gently remove the stencil.
So great, right?  A nice clean line.  The freezer paper really makes a great seal for your stencil.  Put a small sheet of parchment paper over the painted pineapple shape and iron to set the color (about 1 min.)  Now your bag is ready to head to the beach or pool and if it gets dirty, no worries, just throw it in the wash!

I am a member of the Cricut Blogger Network. I may receive prizes in exchange for my winning projects. Even though I am not being directly compensated for these posts, I am under consideration for a prize with Cricut Design Space Star. All opinions are 100% my own.


DIY / etc.

Table Runner Made with Nate Berkus Fabric

August 21, 2014

As soon as I heard that Nate Berkus had a new fabric line at Jo-Ann Fabrics, I was in my car heading to the store.  You guys, Nate knows what he’s doing.  I know this would be fabric I couldn’t resist.  Yep, Nate gets me, grey triangles, yes please!!!!
I bought 1 yard and made a long table runner for my new dining room table in about 30 mins.  I cut the yard in half and joined the fabric in the center of the runner (if I made it without the join, I would have had to have bought over 2 yards).  It’s a busy enough pattern that I don’t think you even notice the seam in the middle.  Because this fabric has a very linear pattern, I followed the lines and cut an extra 2 inches on all sides, this left my room for a nice wide hem.  I turned the fabric under twice to give a clean finish.  This is just what my table needed.  I love the bold, geometric pattern.  Thank you Nate!

Here’s a look at some of the other great patterns and colors in Nate’s line.

Maybe I need more yellow in my life!
And I’d be more then happy to have all three of these black and white combos in my home.  
P.S. This is not an ad or a sponsored post.  I just really love Nate and everything he designs.