etc.

Frameless Mounted Prints

October 1, 2014

Sometimes I come across products that I just think you need to know about.  So, if you are looking for a way to display some of your favorite images in a clean modern way, you might love these Frameless Mounted Prints from Tiny Prints (ya, they are known for their cute invites and beautiful cards as well).  They are simple and much slimmer then canvas prints and you don’t have the glare of the image being behind glass as in a traditional frame.  I love them.

I took 3 of my favorite shots from our Land of Nod shoot this Spring and had them made into these 16×20″ prints for our entryway over my gorgeous mid century credenza (I still can’t believe I found this at Goodwill). We have such fond memories of this experience and we wanted to be able to enjoy these amazing images everyday.


Tiny Prints also makes fun customizable pillows, check out my cute Happy Home pillow and my post about how put the perfect pillow combinations together.    
Thank you Tiny Prints for providing me with beautiful mounted prints for my family to enjoy. 

Images used in the prints are used courtesy of The Land of Nod

Design / etc.

Home Library Inspiration Board

September 29, 2014

I’ve got a fun week ahead. Over the past couple of months, I’ve been working on putting together this home library for a client. My first two room designs, the Coral and Kelly Green Home Office and Global Backpacker Bedroom rooms where well received by the homeowners, so I’m trying another full room makeover. 
I wanted to share the inspiration board for this library living space with you.  It all started with the Stockholm Green Sofa from IKEA. It’s definitely the star of the space. I want this sofa in my home – soon. I’m a big fan of neutrals when it comes to big furniture pieces, but this is just too fabulous not to take a huge color risk on. 
I’m pairing this lovely emerald green with splashes of gold/yellow and strong navy blues. I’ve thrifted lots of really cool items to go alongside the books in the shelves. I’ve got lots of pattern and some great textures. It’s going to be a perfect space to curl up with a great book and a cup of coffee. 
If you’d like to know more about the sources and inspiration pieces in this board, just leave me a comment below.  
What you think about adding color in a large piece of furniture versus just in accessories?  What color are you willing to take risks with?  I never can go wrong with green, it’s in every room and every shade in my house.  

etc.

Friday’s Fabulous Five – Fall Feelings

September 26, 2014

Sheesh, it’s been a while since I’ve posts a Friday’s Fab 5. The truth is, I haven’t had enough time to browse all my favorite blogs and shops lately. But, Fall is here and I’m ready for a change and to try new things.
These are 5 things that popped out at me this week. I want one of every piece of Wit & Delight‘s Target line. It all looks like it was made especially for my home. And, when I get a spare moment, I want to make one of each of these little DIYs with sipping a  refreshing lemony, blackberry drink.  

I hope you have a great weekend. Can you believe I actually got all 5 posts up that I want to? I’m patting myself on the back right now. I’m setting some small and big goals for myself lately. If I’m going to keep up this blog, I gotta step it up. I’m so grateful for you my faithful followers. Thanks for coming back post after post, even when the photos are crappy and there’s days and days between new content. I couldn’t do this without you. Here’s hoping to reach some of my goals!!!

DIY / etc.

Thrifting Thursday – white and wood mid century dresser makeover

Happy Thursday, you know what’s the best thing about Thursdays besides Thrifting Thursday, it’s almost FRIDAY!!!!
I’ve been wanting to share this thrifted dresser makeover with you for a while now.  You are going to be shocked and maybe disappointed at how much I spent on this dresser.  It’s not my usual steal, but I think it’s still a bargain.  I paid $90 for this bad boy.  It was such a solid piece, with great wood grain on the draws and perfectly simple hardware, I couldn’t pass it up.
I liked it so much, I put it in my bedroom and moved the old dresser out.  

Here’s a look at the before.  It obviously needed some tlc.  The top is faux wood laminate and the sides and drawers had a lot of dings and scratches.  So, I decided to paint the top and sides white (like I’ve done many times before) and then sand, stain and clear coat the drawers.  I painted the top and sides with Sherwin William’s ProClassic paint.  It goes on flawlessly with a small mohair roller and lays flat.  This paints dries quickly and isn’t tacky to the touch, like some paints are. 
Painting I’m confident with, but staining wood is not something I’ve played around with much.  But, I highly recommend trying some walnut color stain on something, soon.  I sanded the drawer fronts down to the bare wood, made sure they were clean of any dust and then rubbed on some walnut stain with a rag.  I let is sit for about 5 mins and then wiped off the excess.  Seriously so easy and the coverage was so even and flawless.  (My inside pictures don’t do it justice, it really is a gorgeous warm color and the grain really pops with the new finish).  

Gorgeous, right? If you’d like to know more about the products I used, I’d be happy to add them to this post.

So, I actually haven’t been to a thrift store in over 3 weeks (I lie, I just dropped some stuff off yesterday, but I didn’t even go inside).  What treasures have you scored lately.  If you share pics of your thrifted finds on Instagram, be sure to tag them #thriftingthursday, I’d love to see what you’ve got.

DIY / etc.

Make Custom Temporary Tattoos with Makr

September 24, 2014

I’m not a good business women, I wish I was. But, I do think a GOOD, unforgettable business card is important, especially if you are trying to sell yourself as a creative person. It’s all about first impressions and something that folks won’t forget. Over the last couple of years, I’ve tried to come up with some unique ways to introduce myself through my business cards.  This Summer I gave out Geometric Heart Cutout Business Cards, and last year I made Lavender Sachet Business Cards and Baker’s Twine Business Cards. But, my latest business card, might be the most fun.

With the new Makr App for the iphone, you can create custom temporary tattoos. How cool, right? I’ve had fun with the Makr App for the ipad, making custom book plates and art labels. But, now you can design and order totes, tattoos, and t-shirts right from your iphone (these are exclusive to the iphone version).

And if you are a creative person and want more folks to have access to your designs, the Makr Marketplace might be a perfect fit.

The possibilities are endless with all the great fonts, images and details already available on the app. You can start with an already made design and tweak it so it’s just perfectly yours, you can start from scratch and create your own design or logo using the Makr tools, or you can simple upload your own image (that’s what I did).

I simply uploaded a jpeg. of my geometric heart image (which has kind of become my logo or branding symbol) and then just adjusted the size and hit order! So easy. The arrived at my door in just a few days. I attached the tattoo to my business card with a shiny gold paper clip and slipped them into tiny vellum bags.

You’re going to want this app on your phone. It’s such a great tool for business owners or just creative folks who want to make really cool custom stuff for their parties and events.  

Design / etc.

Dining Room Reveal

September 23, 2014

I’ve been making a few changes to my dining room over the last couple of months. It’s really taken me longer then I thought. But, that’s really the thing with designing and decorating on a very small budget. You have to be patient. You’re not always going to find the deal immediately.  Remember, I sold my table before I had a new one. But, then I scored an amazing Danish mid century one from Craigslist in San Diego. And the chairs were also difficult. It ended up that I had chosen West Elm chairs that had be discontinued. So I had only one and ended up finding 3 more somewhere in Texas and had them shipped to me.

But, the final piece made the space – my new Lamps Plus industrial chandelier.  I chose this gorgeous 28″ wide, 12 edison bulb chandelier. I feel like a real grown up with a real chandelier in my home. It’s big and bold and super sophisticated. I think it’s really important to add just a splash of high end decor to any space. For the most part, my look is very thrifted and diy-ish, so I believe this gorgeous chandelier elevates my space.

This room represents my personal style so much better now. My old table was just fine, but the lines and shape of my new/old table are so much better. We’ve already had lots of company over and we can easily fit 8-10 folks at this table. I think it all plays well with my 1920s built-ins as well. And maybe it just looks disjointed and amateur, but that’s probably because I am both. Either way, I love it.

This is a very hard working space. That little black cabinet is my blog office or as some bloggers call it, their studio. And the opposite wall from the desk is my photo studio, I’m sure you recognize the grey paint color from most of my pictures.  
I love that you can see the new chandelier as soon as you walk into our home. Here’s the view from our living room. 
Here’s a list of a lot of the other details from the space: 
The paint color is Benjamin Moore AF-705 Cinder.

etc. / Travel

NYC Top 10 things to do and see

September 22, 2014

I’m back from an amazing 5 days in NYC.  On Thursday I attended the Better Homes and Gardens Stylemakers Event. But, I actually flew out on Monday so that I could have a couple days in the city by myself. Lately I’ve been feeling very burnt out and just kind of blah. I was lucky enough to get invited to the BHG event again and my husband suggested that I take a couple more days to get lost in the city. I’m so grateful. I walked and walked and ate all kinds of amazing food and just enjoyed being by myself. I highly suggest a couple days in the city to just people watch, sight see, walk and just have some time to think. 
Lon and I spent 5 days in NYC last Summer to celebrate our 15th wedding anniversary and then last Fall I went to the BHG event, so after this trip, I feel like I’m a lot more familiar with the city. I thought I’d put together a Top 10 for NYC, kind of like I did for Maui. These are definitely not all the top tourist sites, but they are the things and places I would totally go back to and not want to miss if I’m in NYC again.  
1. Ride the Subway! Get yourself a Metro pass (I got a 7 day unlimited pass for just $30). It’s not only efficient and convenient, it’s a great way to people watch.  I put the Embark app on my phone, and it never steered me wrong.  
2. I have lots of food suggestions for NYC, but Dough Brooklyn is AMAZING! I’ve had their Lemon Poppy Seed and Passionfruit. 

3. The Met is a must. I love seeing the impressionists and this time I made it to the roof top garden. If the weather is nice, definitely have a Jalapeno Lemonade (with or without Tequila).

4. Use the Citi Bikes. It’s a great way to see the city. Lon and I even biked over the Brooklyn Bridge a couple times.

5. The Brooklyn Flea is a fun stop if you are there on a weekend.

6. See a Broadway Show!!! There’s nothing like it. My favorite show so far in Once, but everything I’ve seen has been amazing.  Buy your tickets the day of the show at TKTS in Time Square and save up to 50% off, that’s how we’ve seen everyshow.  Why spend $140 when you can get tickets for $70, and we’ve gotten amazing seats everytime.

7. Eat Pizza! No really, NYC has amazing Pizza. This time we ate at a fun place in Brooklyn called Roberta’s. They have a fun outdoor eating area, and someone was chopping wood for the wood oven during the meal.  Grimaldi’s is supposed to be the best, but every piece I had in the city was really top notch.

8. Walk over the Brooklyn Bridge (or bike).  It’s a gorgeous bridge and the views of Manhattan and Brooklyn from it and amazing.

9. Take a picture of Manhattan from Dumbo in Brooklyn (especially at night). It’s also fun to take the Staten Island Ferry for a good view of the city.

10. And last, but definitely not least, visit Central Park.  It’s gorgeous and you can’t believe you are still in the city. If you are traveling with kiddos, be sure to take them to Heckscher Playground in the park.

And because there really is so much to do and see in the city, here’s a few bonus things to add to the list:

– Have a bagel at Ess-a-Bagel
– Visit the Flower District
– If you love dishes, Fishs Eddy is a must.
– Have a shake or just frozen custard at Shake Shack by the Flatiron.
– Eat ANYTHING at Eately.
– Brunch or breakfast at Sarabeth’s.

etc. / Food & Drink

Rosemary, Goat Cheese and Fig Galette

September 15, 2014

This week I’m out of town for the Better Homes and Gardens Stylemakers Event in NYC, lucky me. And to change it up a bit, I’m asked some of my favorite bloggers to guest post for me. I’m pretty picky and like to create my own content, so I’m only bringing you top notch, quality bloggers here guys.

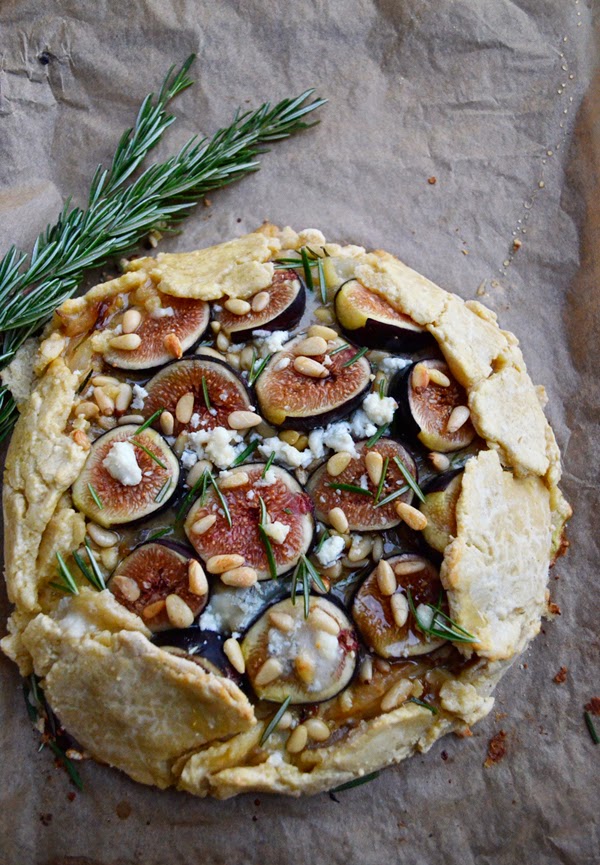
I’m so pleased to introduce you to a blogger you need to know. Today Julianne is going to bring you a gorgeous recipe for a Rosemary, Goat Cheese and Fig Galette, sounds amazing, right? 

Hello Oleander and Palm readers! I am so honored that I was asked to share a recipe here. My name is Julianne and I write over on Fern and Fog, where I try to highlight the beautiful, everyday moments in our lives: a lively family meal, quiet moments of retrospect or artful endeavors.  

Cooking in my home can be lively or quiet, artful or just messy, but all-in-all, an adventure which my whole family must partake in. Usually I can create something edible. In this case, I cooked up something truly delicious.
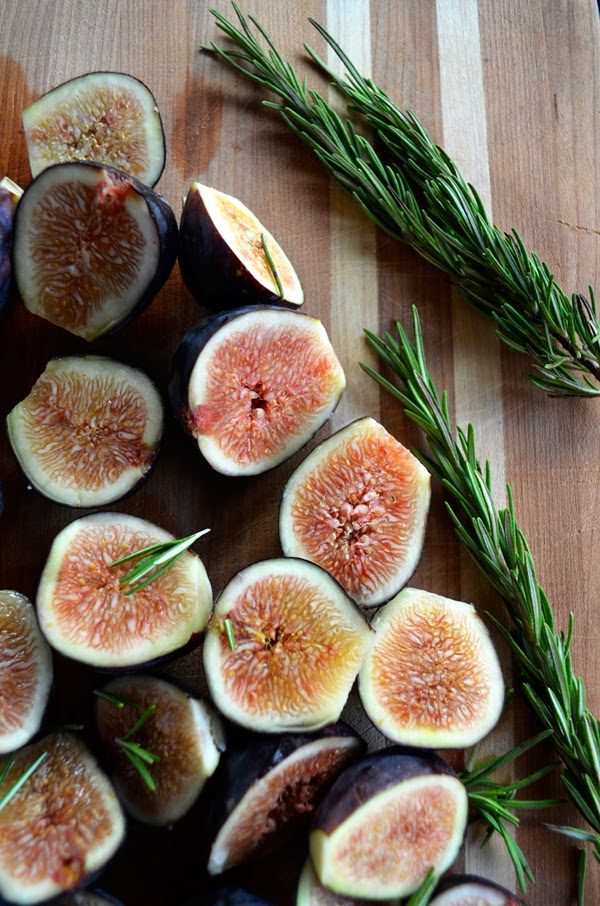
I have recently given figs a chance. Growing up I never ate a fig, if I did I had no clue what it was. Now I see figs everywhere and in the town where I live people eat them as nonchalantly as a basket of strawberries. I was told by a sweet persuader who thought I might be irked by the way they look, “take a bite, but don’t look at the center.”  I followed those directions and was pleasantly surprised at how mild and subtly sweet they were, and the center only looks slightly like a brain.
I am now completely curious about how to cook with them. Upon research I discovered some pairings that complimented these sweet little fruits: honey, earthy prosciutto or a little goat cheese. Thus came the rosemary, goat cheese and fig galette.
Sometimes I impress myself. It’s crazy. A galette is a free-form crusty cake, basically a really rustic pie. I appreciate making something that is a little less than perfect and calling it “rustic”.
Rosemary, Goat Cheese and Fig Galette
2 large onions (1 ½ pounds), halved lengthwise and thinly sliced
1 sprig rosemary, more for garnish
Pinch sugar
1 teaspoon sherry vinegar
¼ cup milk
1 egg
Flour for dusting
¾ pound prepared puff pastry or pie dough
1 pint fresh figs (3/4 pound), stemmed and cut in half lengthwise
5 ounces goat cheese (I used Cypress Grove’s Truffle Tremor)
2 tablespoons pine nuts
Honey for drizzling (optional)

1. In a large skillet over low heat, melt butter with oil. Add onions, rosemary and sugar. Cook, tossing occasionally, until onions are limp and golden brown, 30 to 40 minutes. Stir in the vinegar, scraping any browned bits from bottom of pan.
2. In a small bowl, whisk together the milk and egg until smooth. Stir in the onions that have just been caramelized and about 4 ounces of crumbled goat cheese. Preheat oven to 400 degrees. Line an 11 by 17-inch baking sheet with parchment paper. On a lightly floured surface, roll out pastry to a 9 by 12-inch rectangle. Transfer to baking sheet.
3. Use a fork to spread onion mixture evenly over pastry (let excess egg mixture drip back into bowl), leaving a 1-inch border. Arrange figs, cut-side up, in even rows on onion mixture (if they don’t look perfect, that’s ok! It will add to the rustic theme). Scatter cheese and pine nuts over figs. Use a pastry brush to dab edges of tart with egg mixture. Gently fold over edges of tart to form a lip and brush with more egg mixture.
4. Bake until pastry is puffed and golden, 25 to 30 minutes. Serve, sprinkled with rosemary needles and drizzled with honey, if desired. Cut into wedges and serve at hot, warm or at room temperature.
Yield: 8 servings.

etc.

Wallums Wall Decals Giveaway

September 12, 2014

So many of you loved the Wallums World Map Decal, in the Global Backpacker Bedroom, that I’m excited to tell you that Wallums is generously going to giveaway a $50 Gift Certificate to one lucky winner. There have so many choices, you are sure to find one that fits your home and style.

Here’s a few of my personal favorites.

The world map decal is so intricate and detailed, I can’t image ever painting that on a wall. And the beauty of decals is that they are 100% removable. Perfect for rentals or for folks that have commitment issues.

We put up the map decal in very little time at all.  For a decal this size, I do recommend having 2 people. We started by taping the decal to the wall where we wanted it, then we taped down the center of the decal. We peeled back have the backing to the middle tape line, and working from the center  moving to the edges we adhered it to the wall by rubbing it.  We did the same to the other side and then removed the paper backing. So simple and such a dramatic focal point to the room.

Ya, that’s my brother showing off his biceps as he rubs on the decal.

Enter to win a $50 Gift certificate to Wallums below. I’ve given you 3 chances to enter (leave a comment, follow Wallums on instagram and follow Oleander and Palm  on instagram).

a Rafflecopter giveaway

etc.

5 Potty Training Tips

I’m not a mommy blogger and being a mom is not what I regularly write about here. But, the truth is, I am a mom and this topic of potty training has consumed A LOT of my time lately. Remember this scene, we’ve been at it for a while now. Yes, we are definitely potty training. So, if you aren’t the mom of a toddler, please just check out Olivia’s cute little legs and come back for my usual topics tomorrow.
You know, my first two where both potty trained by the time they were 2, through the night and everything. I really thought I was such a great parent until I had Olivia. This kid is a tough cookie. And as we approach 3 years old, I’m really wanting some potty success now more then ever.    
I don’t think there is a magic system or a secret to potty training your kiddos. It’s really just a lot of work. And every kid is different, so don’t beat yourself up. But, I’ll share with you what I think works. It’s just my 2 cents worth on potty training. I’m definitely not an expert, but I am a mom of three kids.
Here’s 5 tips that you might find helpful:
1. Be Consistent – This is the hardest one. But, you have to be consistent about using the potty regularly. This is easier at home, but you’ve got to be ready to see the inside of every Target, McDonald’s and Mall bathroom. It’s not convenient or fun, but you got to take them often. I love the Pull-Ups Time to Potty App on my iphone that gives a reminder of when to visit the potty. 
2. Make it fun – You’ve got to be positive and up beat. Kids are so good at reading your attitude and feeding off it. If you are frustrated or anxious, they know. They are so stinkin smart. Make potty time fun with songs, stories, even an iphone game if you need to.  Just smile and think happy thoughts.
3. Have the right tools – I’ve listed a few of our favorites in the image below. Underwear are a must. It’s the best way for kids to feel when they go. Candy can be a reward, as far as I’m concerned. We have a jar in the bathroom and just one sweat can be a nice treat. You can find other rewards, but kids do like candy. A potty seat is a must, you don’t want them to be afraid to go. They need to feel secure, I love this folding one, I keep it in the diaper bag and it goes everywhere with us. At home a stool is good to have. You want them doing it all by themselves. You don’t want to be lifting them up of the potty everytime they go, they need some independence. And Pull-Ups are a lifesaver. They go on and off like underwear, but you don’t have to panic through nap times and bed time.

1. // 2. // 3. // 4. // 5.
4. Promise a Pony – Well, maybe not a pony, but the reward has got to be worth it. Not everyone is ok with candy for their kids. I think a little doesn’t hurt, so Olivia got one M and M/Skittle like candy if she would pee on the potty. I’m a teacher, this might be called positive reinforcement or an incentive, I call it bribery. I WANT her to go potty and maybe I am bribing just a bit. 🙂 But, when it came to pooping, stickers and candy just wasn’t enough. I made BIG promises, like toys and even a trip to the Mall to ride the little train there. The reward had to be worth it to her. I only made promises that I could and wanted to keep. But, a couple $5 toys and 30 mins at the Mall was totally doable for me if we could be on the road to pooping in the pot. Figure out what your kid LOVES and use that to your advantage, maybe it’s as simple as a little TV time. Each kids is different. 
5. Grow up kid – no more babies, no more baby talk. Use the big boy, big girl card as often as possible. Catch them doing things independently and tell them “You’re so big, you can …….”. They will love hearing it. Then when it comes time for the potty, you can say, “I know you’re a big kid because you …….., so let’s be big and use the potty”.  

I hope this helps and good luck my friends.  May the odds always be in your favor. (Sorry for so many Olivia pics, but I think she’s pretty cute and the Grandmas are going to be really happy that I posted so many).


This post is brought to you by Pull-Ups.  For more tips, advice and tools, check out the Pull-Ups Big Kid Academy.