Category Archives: etc.

etc.

Mason Jar Monogram Light

August 31, 2012

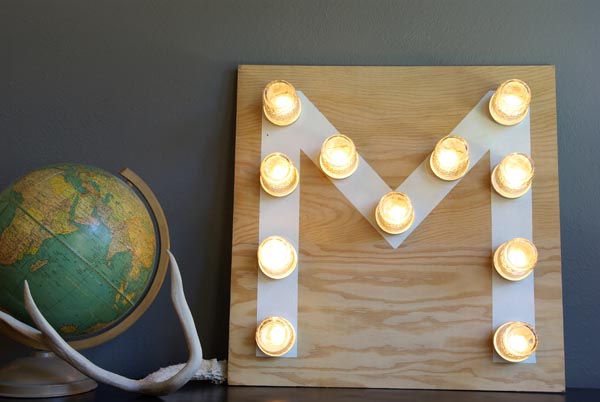
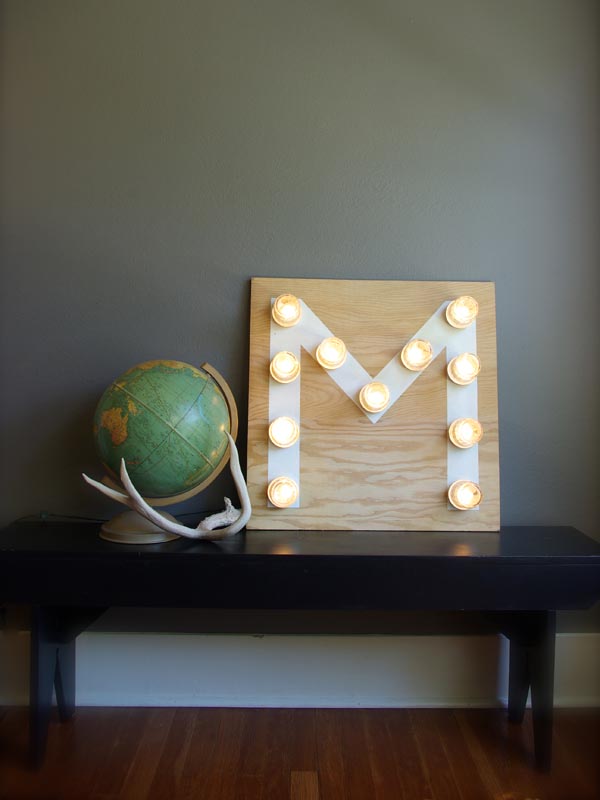
I was recently invited to compete in the Mason Jar craft challenge.  This was a little difficult, seeing there are so many unique and creative ideas out there using Mason Jars.  I came up with a few ideas, googled them, and they had already been done.  But, I’m pretty excited about my Monogram Light and believe it truly is an original idea.  I came up with this Monogram Light using canning jars as the bulb covers.

I originally designed this light to use outside on our back patio, to enjoy on warm California evenings.  But, now that it is finished, I kind of love the modern touch the plywood and white adds to the interior of my house.  It a playful accent in our 1920’s bungalow.

Supplies:
2ft square piece of 1/2″ plywood
11 quilted canning jars and rims (you may need more or less depending on your letter)
1/2 wood screws
white paint
blue painters tape
power drill with a 3/4″ bit
1 string of outdoor lights
1 nail and hammer
measuring tape

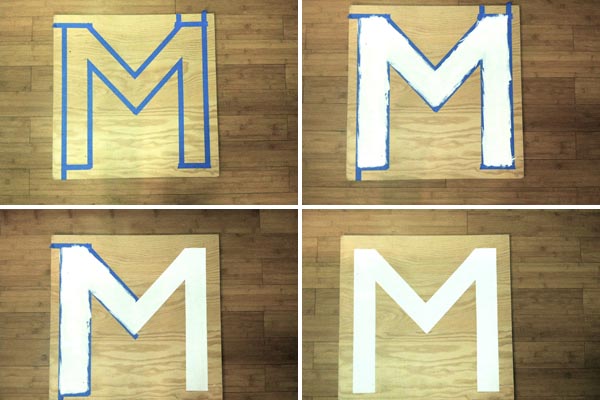
It looks more complicated then it really is.  Once I had the right supplies, it didn’t take me long to make.    Start by taping off your monogram, mine is an M.  Then paint it white.

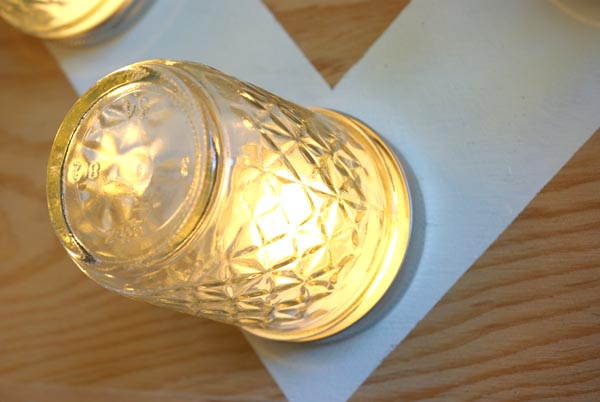
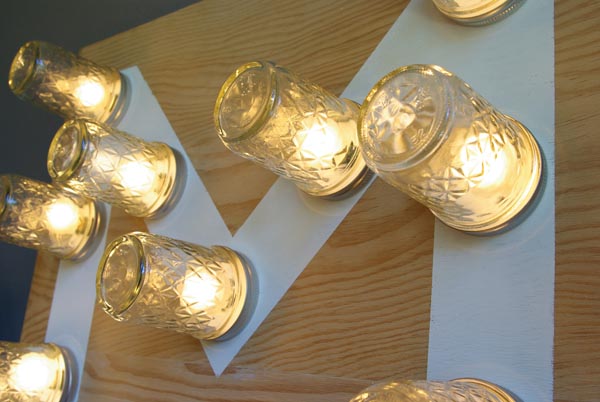
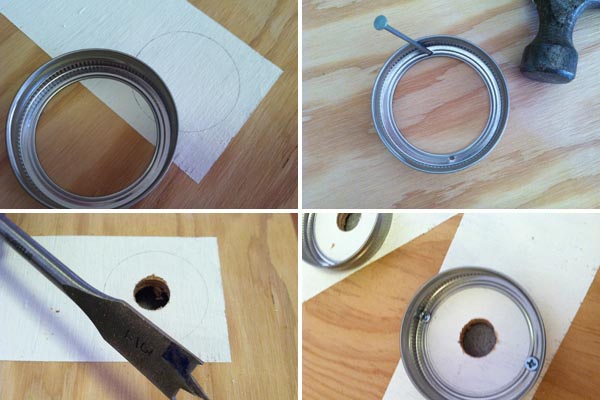
Lay out the jar rims on your monogram and trace the center of each, so you can remember where to place them.  Then, using a good sized nail and hammer, punch 2 holes in the center of the jar rim.  This will make it much easier for you to put in the screws.Then, using a 3/4″ bit, drill out the center of each marked circle.  Lastly, using the 1/2″ screws, secure the rims to the board.

Insert the light socket in the holes and then screw in the light bulbs.  Screw down a jar over each light bulb. Plug it in and you are done!

You can see my entry at Buzzfeed‘s Craft Wars.  
If you like what you see, BE A FRIEND!  Leave a comment, follow Oleander and Palm by email, PinterestFacebook, or Twitter.

etc.

Squares in Pairs Baby Quilt

August 29, 2012

I’m sorry for the absence of posts.  I’ve been pretty busy with projects, sewing, and not to mention the first weeks of school and trying to figure out pick up and drop off schedules.

I finished my new niece’s baby quilt this week.  She is due to arrive in a few weeks.  I made her big brother’s quilt and helped out with his nursery.  I went totally girlie on this quilt.  They have painted the nursery a pale grey and have super cute white birch tree decals on the walls.  They also have some calico birds perched on the branches (and I made them a fun mobile, here it is).  I took the quilt colors from the bird colors and patterns.

I’m calling this quilt “Squares in Pairs”.  I took 4 pairs of fabrics and put them together in rows.  It’s a pretty eclectic and free quilt.  I gave it a couple simple borders and then backed the whole thing in a grey tree branch fabric that my sister in law picked out.

etc.

Thrifting Thursday: Vintage Globe Bank

August 23, 2012

This find was given to my husband right away.  He has had a thing for globes for a long time.  It works out well for me.  He is happy to visit antique stores and flea markets with me, because he can hunt out globes, atlases and maps for his collection.

I found this little guy the same time I found my Bay Blanket.  This little globe doubles as a piggy bank.  It’s a metal bank with just the right amount of rust and scratches.  I love the faux wood painted base on it.  We need to find a new stopper for it, but Lonnie plans to put his change in it at the end of the day.  From my quick look at the political lines, the globe is from the 60’s, but Lon will have to look into it more.  He can date them a lot better then I can.

Here’s a tip for antiquing or thrifting: When buying more then one item, offer to pay a combined lower price. For example, they wanted $15 for the blanket and $15 for the globe.  So, I asked if they would take $20 for both items.  And they accepted my offer.  They want to move inventory, so group your purchases and you’ll save.  

Do you have any great tips for getting a lower price then the asking price?

This post is being linked up at The Blue Eyed Owl.

etc.

Back to School Bouquets

August 22, 2012

Well, the kids are definitely back in school.  We are starting to get into a bit of a routine.  I like to start the year off with a gift for my kid’s teachers.  It’s simple Math – Happy Teacher = Happy Students!  Last year I made fresh Apple Scones for the teachers and the year before, I made reuseable coffee cup sleeves.  
This year I thought a flower bouquet would brighten their day.  These we easy to make and really didn’t cost too much.  
Supplies:
Pencils (about 32)
Crayons (about 25)
An empty baby food jar
An empty Starbucks Frappacino Bottle
2 rubber bands
Ribbon
Flowers

For the pencil vase, I wrapped an empty frappacino bottle with an elastic band and the inserted the pencils all the same direction.  And for the crayon vase I just used an empty baby food jar.  Then I simply tied a cute ribbon around the rubber band to hide it and then filled them with flowers.

Are your back into a routine with the start of school?  Is that routine welcomed or are you longing for more summer?

If you like what you see, BE A FRIEND!  Leave a comment, follow Oleander and Palm by email, PinterestFacebook, or Twitter.

etc.

London Fog Shortbread

August 17, 2012

I think it’s a Canadian drink, but a London Fog is a Earl Grey Tea Latte with Vanilla.  This is my cookie version of this warm, comforting drink.  It’s a buttery, tender cookie that has the distinct and unique flavor of Earl Grey Tea infused in it.  The perfect partner for a warm cup of tea.

London Fog Shortbread
1 cup butter
2/3 cup powdered sugar
1 3/4 cup flour
1 tsp. vanilla
1 vanilla bean split and scraped (1 tbsp. vanilla bean paste)
2 tbsp. Earl Grey Tea (about 3 tea bags)

Cream the butter and sugar with an electric mixer.  Add the vanilla, vanilla bean, and the tea.  Add the flour and mix until the dough comes together.  Wrap the dough in plastic wrap and chill for at least 30 mins.  Pre-heat the oven to 350F.  Roll out the dough to a little less then 1/4″ on a well floured surface.  Cut out desired shapes.  Place on parchment lined baking sheets.  Chill the cut cookies for at least 20 mins. before baking.  Bake the cookies for about 12 mins. or until the edges are just barely brown.  Cool on wire racks.

These cookies freeze well in an air tight container.

etc.

Thrifting Thursday: Hudson Bay Blanket Remnant

August 16, 2012

I love Hudson Bay Blankets and all the National Park Blankets, but there is no way I will ever be able to afford a new one.  Last year I scored a beautiful one at the Pasadena Flea Market.  It was in excellent condition and even had the original seal on it.  I had it professionally cleaned and gave it to my brother for Christmas.  I’m always on the look out for another one at antique stores and flea markets.

I lucked out and found this piece of a blanket at Old Town Antiques in Eureka (where I got my grey pitcher).  They wanted $15 for it, but I got them down to $10.

I have plans to make something out of this remnant for Riley, my vintage trailer.  If you remember Riley’s inspiration board, I had hopes of a Bay Blanket there.

Is there a certain item that you are always on the look out for when you are thrifting?

This post is being linked up at The Shabby Nest and The Blue Eyed Owl.

etc.

Blackberry Vanilla Sauce

August 14, 2012

I’m back up in Northern Cali (Eureka, at my parents place).  We are escaping the heat one last time before school starts.  The blackberries are one and we’ve been picking gallons of them.  We usually make batch after batch of blackberry jam, but this year I’ve changed it up.  So far I’ve made Blackberry Apple Jelly, Blackberry Curd (to die for), and this amazing Blackberry Vanilla Sauce.  This sauce is perfection.  It’s bright and tangy, not too sweet, and the vanilla adds a warm layer to the flavor.  So far we’ve had it on vanilla ice cream, but I can’t wait to serve is on warm crepes or belgium waffles.

Blackberry Vanilla Sauce
10 cups of fresh blackberries
1 cup water
2 vanilla beans scraped (or 2 tbsp. vanilla bean paste)
1 tbsp. vanilla
3 tbsp. lemon juice
4 cups sugar

In a blender, puree the blackberries well.  Then strain as much juice off the pulp as possible.  I put mine berries through a fine mesh sift and used a spoon to move the pulp around.  I got 6 cups of juice from my berries.

In a large pot, combine the juice, water, lemon juice, vanilla, and sugar.  Mix well.  Cut and scrape the vanilla beans.  Put the vanilla scrapings and the whole bean in with the juice/sugar mixture.  Bring to a rolling boil, then reduce the heat to medium low and simmer for 20-30 mins. or until the sauce reduces 1/3 in volume.

Pour the hot sauce into prepared jars (5-6 half pint jars).  Wipe the rims, put the lids on, and process for 10 mins. in a water bath.

Don’t be intimidated by canning and preserves.  It’s so much fun.  I love that the finished product lasts for a long time.  It’s so nice to have things like this yummy sauce on hand in your pantry.  You can easily turn a simple dessert into something very special. 

etc.

Thrifting Thursday: Green Frame

August 9, 2012

Often I like to improve or update a thrifted find in some way. But, sometimes they need no facelift or sprucing up at all.  This frame is a good example.  I love how the paint is worn off and chipped in places.  And this perfect shade of green is what caught my eye.

I bought this frame in a little antique mall, downtown Bakersfield.  I paid $8 for it.  That seems kind of pricey when I actually write it down.  But, that’s the beauty of thrifting.  Because I save on so many other things, like my $1.42 tray, I can afford to spend a little more on other fun finds.

It’s a little bigger then a  5X7″ frame, so I just backed my picture with a some grey card stock.  The Paris ladies in waiting wasn’t my style, so my cute kids replaced it.  Oh, if the original image appeals to you (it’s from the 1940’s), let me know, maybe I can send it your way.

What have you found thrifting lately?  Leave a link in my comments so I can check out your finds.  

etc.

Instagram Necklace

August 7, 2012

This is fun DIY folks.  Are you digging instagram like I am these days?  I’m having so much fun playing with filters and sharing my stylish pictures instantly with my friends.  I’m such a visual person, so thumbing through all my instagram friends images is quite addictive.  I love how nothing really needs to be said or explained.  It’s fascination having a peak into someones else instant life.  I’m amused and entertained by what people share on instagram.  It’s quite revealing.

Sometimes I think my instagram pictures are some of the best pictures I take.  I think a lot of it has to do with the unplanned nature of taking a picture with your phone.  It can be whipped out in a seconds notice and then that spontaneous moment in time is captured.

I decided it would be fun to have a modern twist on the traditional locket.  So, here’s my Instagram Necklace. This is a two sided locket that fits 1 1/4″ square images, perfect for instagrams.  For now, mine has 2 images from the 4th of July.  We were in Carlsbad, NM for the 4th.  The first is my beautiful kids and the second is some fireworks.  The beauty of this necklace is that you can trade out the pictures whenever you want.

Supplies:
1 Beading Landing (Bezels, Frames, and Filigree) Square Pendant  – available at Michaels
1 42″ length of metal chain (Blue Moon Beads, Oval chain in Burn Silver) – available at Joannes
Needle nose pliers
Scissors
Two 1 1/4″ square images (Instagrams!)
Oh, and I added the cute little camera charm – available at Target for $4.99

I’m sorry you are going to have to actually go to the store for these items.  I looked all over the internet and couldn’t find either the square pendant or chain.  Sorry friends I tried. Oh, but these items where very inexpensive. I got the pendant for $2.40 and the chain for $2.40 (both bought with 40% off coupons).

Here’s what you do:
1.   From a mac, in iphoto, select the instagram image you would like to print.  In the print window, go  to Print Size and select custom. Then enter 1.25 ” by 1.25″.
2.   Print the image on photo paper.
3.   Cut out your 2 images.
4.   Place them back to back in the pendant.
5.   Measure the length you would like your necklace to be.  Mine is about 36″.
6.   Remove one link from the chain and slip it onto the top of the pendant  (leave the link open).
7.   Then attach that open link to one end of the chain and using the pliers pinch it closed.
8.   And finally, close the necklace by attaching the lose end of the chain to the link you just attached.

I’ve been wearing mine a lot this week.  Does this look like a project you might attempt?

Oh, and if you are not already following, my instagram name is jeranmcconnel.  And if you like what you see, BE A FRIEND!  Leave a comment, follow Oleander and Palm by email, PinterestFacebook, or Twitter.

etc.

DIY Ikat – YouTube Video

August 6, 2012

Last week I shared with you the thrift store tray I hand painted an ikat pattern onto.  Well, here’s the DIY video.  I have step by step instructions, so you can easily paint your own ikat pattern.

Remember I put together a DIY video for my Spring Wreath.  That was months ago, so I thought it was about time I tried another.  I’m a visual learner, so reading instruction sometimes just doesn’t work for me.  So hopefully some of you will find this method helpful.

Once again I feel like a total dork and I’m not sure why I talk the way I do or make the faces and hand gestures that I do.  It’s hard to watch yourself on video, very humbling.

I’d love your feedback.  Please let me know if this is helpful and whether or not my instructions are clear and easy to follow.  Happy painting friends.