Category Archives: etc.

etc.

DIY Christmas Ornaments: Salt Dough

December 5, 2011

Click here for an easy to follow how-to video.

Well, as you can see, my week of DIY ornaments took a little break.  It wasn’t my intention, but life has been a little busy.  I have taken on a big project – I’m in the middle of making the costumes for my mom’s Christmas program at her church.  I’ve made 3 spiders, 3 flowers, and I’m in the process of making a duck, a skunk, a bull, a donkey, a camel, and a cow (and there are more I’m not remembering right now). So, I’m going to attempt to stay on top of it all this week. ‘Tis he season for being slightly crazy, right?

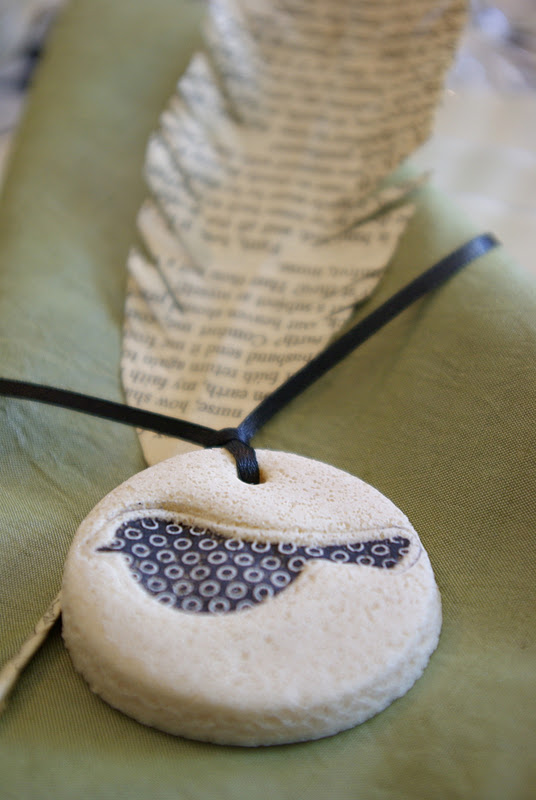
So, this will take you back to elementary school.  I’m sure you all made these in the 3rd grade, and your mother hung the ugly blobby things on your tree, and you were so proud.  Well I think this might be an update.  These simple ornaments are made with the classic salt dough recipe, but stamped for a cleaner design.


Salt Dough
1 cup salt
2 cups flour
1cup water

Mix all ingredients in a mixer until a smooth dough forms.  To dry the dough, bake in a 250F oven for at least 3 hours.

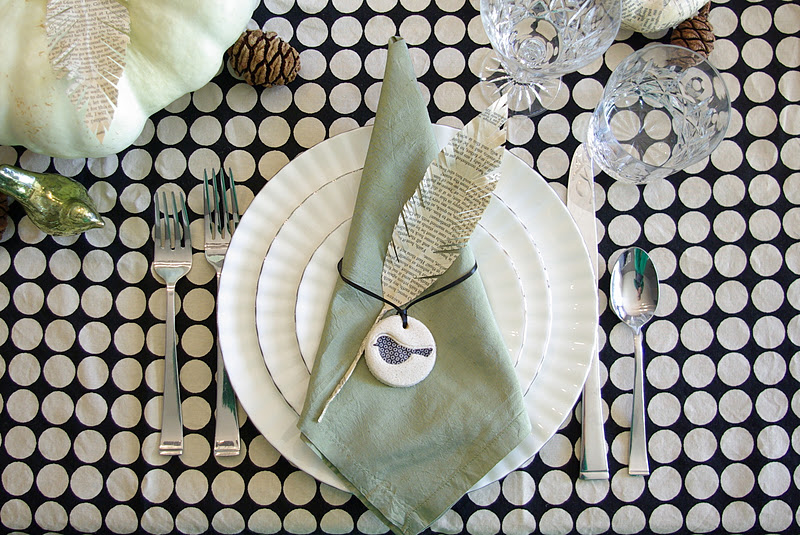
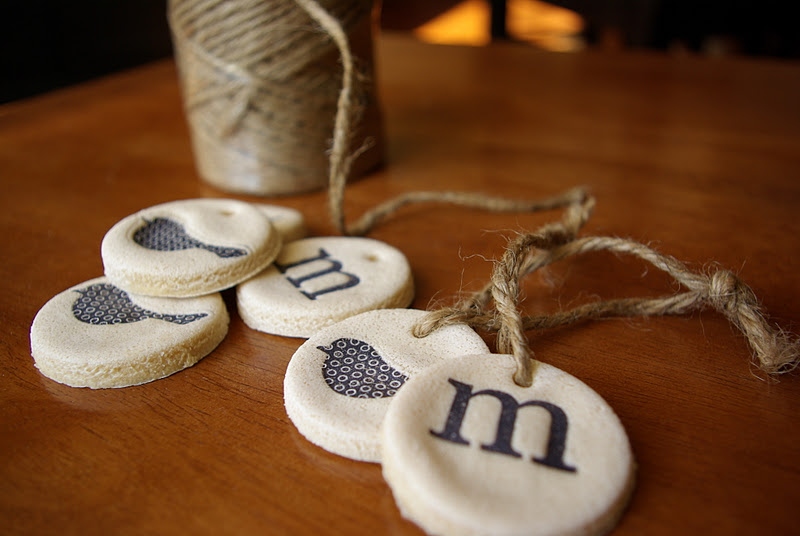
I rolled out the dough to 1/4″ thick, stamped my M’s (for McConnel) and birds and then cut out the circle.  It was easier to stamp first so that the image would be centered.  I rolled out the dough on the parchment paper so I wouldn’t have to move the ornaments.  Oh and I just used a regular plastic drinking straw for the hole at the top.  Once they were dry, I threaded twine through the holes.  These look cute on the tree and attached to gifts.  I also used them as napkin rings for Thanksgiving.  I of course made a batch for my kids and they spent hours making all kinds of treasures for the tree as well.

What has you overwhelmed and hectic this season?

BE A FRIEND!  Leave a comment, follow Oleander and Palm by email, Pinterest, Facebook, or Twitter.

etc.

DIY Christmas Ornament: Wool Snowballs

December 1, 2011

I said that these ornaments were going to be cheap and easy, so let’s start with the cheapest and easiest one to make.  I’m calling these Wool Snowballs. 

These a simply 100% wool wrapped around foam balls.  Once the ball is wrapped to the desired amount, I secured the end of the wool yarn with a small bead of hot glue.  These look cute hung on the tree or piled on a covered plate or bowl like I did.

I used a bag of foam balls from the dollar store.  They came in 1/2″, 1 1/2″ and 2″ balls, 8 in a bag for just a buck.  And I used Martha Stewart Crafts 100% roving wool in the color snowdrift (this is available at Michaels).

BE A FRIEND!  Follow Oleander and Palm by email, PinterestFacebook, or Twitter.

etc.

A Week of DIY Christmas Ornaments

November 30, 2011

I had so much with Pumpkin Spice Week, that I’m going to have a week of DIY Christmas Ornaments.  Starting tomorrow, December 1st I will show you a simple DIY ornament everyday.  I true Oleander and Palm style, they will be super quick and easy to make and very inexpensive.

After reading your comments and suggestions, I think we will have a Week of Soups coming up next!  Any other theme weeks that you would like to see?  Leave me a comment with your suggestion.

etc.

Christmas in LA

November 29, 2011

Look between the palm trees on the mountain, and you can see the Hollywood sign.

80 something degrees in LA this Thanksgiving weekend, got love the Holidays in Cali.  Heads up! this post has lots of links, so if you are looking for a fun day in LA, I’ve linked all the info you should need.

We like to go to LA, as a family, at least once before Christmas to do the city thing.  We always end up at The Grove, because we love the atmosphere.  For those who are not from So. Cal, The Grove is a great outdoor mall that has dancing water fountains, a trolley, and is attached to the Historic Farmers Market (which has some of the best eats anywhere).  Oh, and we always spot someone famous.  At Christmas it’s even better, they put up a huge tree and have fantastic decorations, even Santa and his reindeer flying overhead.   There is always live music and a brass band that roams around and plays Christmas carols.

The D’s at the Grove, Santa flying overhead.
This time we started the day in a new part of LA to us.  I read an article in Sunset magazine about Larchmont Boulevard.  So we wondered through the little shops, the farmers market and the had brunch at Larchmont Bungalow.   One of my favorite shops was The Little Seed.  They even sold cute fabric toys from Barefoot.  Denali spotted the Barefoot toys right away.  When we went to visit my parents in Sri Lanka a few years ago, my mom took us to Barefoot.  I fell in love immediately and bought a lot of fun toys, fabric and bags there.  We didn’t really buy much, but had fun window shopping.  I did get some fantastic Raspberry Balsamic at the farmers market and some very cute bibs at  Pickett Fences for Olivia when she starts eating solids.  
We finished our morning in Larchmont Village at the Larchmont Bungalow. Lonnie and I shared the Mole Eggs Benedict and the kids had Dark Chocolate Bread Pudding Pancakes (need I say more?).

My handsome, bearded husband (he does this at least once a year)

etc.

Oreo Truffle Pops

November 23, 2011

This is my 200th post!  To celebrate I shall eat an Oreo Truffle Pop and share the recipe with you.
These are always a favorite at any event.  I like to make these for birthdays or just any celebration.  I actually made these fall colored ones for Dylan’s teacher for Thanksgiving (Thanks Mrs. Girardi for all you do).  They are super easy to make.


Oreo Truffle Pops


1 package of regular Oreos (no double stuffed)
1 8oz. package cream cheese
Wilton Chocolate melts or any other good melting chocolate

In a food processor, blend the oreos until they are completely crumbs.  Then add only 3/4 of the cream cheese to start (6 oz.).  Blend again until the mixture comes together in a ball.  If you need to add more cream cheese, add about a tbsp. at a time till the dough will hold together in balls.  Refrigerate this for about 1 hour.

Roll the dough into 1 inch balls and refrigerate again until they are firm.  Melt the chocolate.  Dip the sticks into a little bit of chocolate and them insert them into the balls.  Refrigerate again.  Then dip the balls in the chocolate and tap them on edge of a bowl to remove the excess chocolate.  Add sprinkles while they are still soft.  Refrigerate again!  Oh, and I use a chunk of florist foam to stand the pops up in while I am working on them.

By my 200th post I imagined I might have a few more followers, but I am thankful for my faithful few that do read.  I have fun blogging, so I guess I will continue.  More then anything, I do enjoy reading your comments.  Please let me know what you like to read about most, I want your input

etc.

Thanksgiving Table Setting: Birds of a Feather

So, here’s the finally setting.  I’ve used my paper feathers and salt dough ornaments to decorate the place settings.  My kids and I have been having fun with salt dough.  I will share instruction on how to make salt dough ornaments sometime in the near future.

Next week we will have a little vote on your favorite setting.  Have a fantastic Thanksgiving.  I hope you have time to enjoy loved ones and of course some yummy food.

If you like what you see, BE A FRIEND!  Follow Oleander and Palm by email, PinterestFacebook, or Twitter.

etc.

Thanksgiving Table Setting: Navy and Gold

November 22, 2011

Ok, I’m wishing I was a stylist for something fun like Anthropologie.  I’m really enjoying putting together these place setting posts.  This next one looks expensive, but totally isn’t.  The touches of gold are simply metallic gold paint on a mini pumpkin and then I taped off and painted some old cutlery gold on the handles.  Navy blue is everywhere right now, and it’s really growing on me.  I actually purchased the napkins here to make pillows.  I haven’t gotten that far yet, so why not use them for their intended purpose.

Tablecloth: Gift from my mother in law (I think it’s from TJMaxx)
Dinner and Bread Plate: Homegoods
Salad Plate: Bought in Japan
Napkin: World Market Navy Ikat Dot
Cutlery: Old stainless steel painted metallic gold on the handles
Place card: Mini pumpkin painted metallic gold with 2 oak leaves cut out of vintage book paper

etc.

The Grey Dining Room

November 16, 2011

So here’s the finished product.  Yesterday I posted “Before” pictures of my green dining room.   I think I picked the right grey.

I’m really happy with the color change.  The room feels modern even though it’s almost 100 years old.  It even makes me like my dining room table again.  I was feeling lazy and didn’t want to make Thanksgiving dinner, but now I want to because I have a beautiful room to host it in.

A Little Fall Decor

What do you think?  It’s a dark color, but I think it works.  I would love to hear your opinions.  Anyone love grey as much as I do?

etc.

Picking Paint Colors

November 15, 2011

One of the hardest things to do in home design is to pick the right paint color.  I have been really tired of my dining room paint color for a while.  It’s a really pretty sage green, but it’s dated now.  I am embarrassed to say that I painted it that color 8 years ago.  It’s time for a change.  Green is still my favorite color, but I am ready to try something new.

The Before – the green needs to go.

Slowly be surely my house is becoming grey.  It is just my favorite neutral and you can find it everywhere in design and interiors now.  When we put an addition onto our house and remodeled 3 years ago, I painted my kitchen, laundry room, bedroom and master bath all grey (Benjamin Moore Aura – Nightingale AF- 670).  Then when I decorated my son’s room all star wars, I painted his room grey as well (Benjamin Moore – Smoke Embers AC – 28).  And now the girl’s room is pink (Benjamin Moore – Elephant Pink 2087-70), but has lot’s of grey accents.  Oh, and I got a new area rug for the living room, and it’s grey as well.  So, needless to say, I want to paint my dining room a nice dark charcoal grey.

Paint chips taped to the wall, checking out the colors at different times of day.

When I pick a new paint color, I start by bringing home no less then 35 paint chips (no kidding). When you go to pick out a color, you are always surprised by how many shades there are of it. Then I bring them home and look at them in the light of the room the color will be in. This usually weeds out at least half the samples. Then I start taping them up on walls, and they look different again and you can throw away another half of them. Now, I’m usually down to 7 or 8 samples and I start comparing it with other colors in my house. I don’t want there to be drastic color changes, so I try to pick colors that compliment each other.

Lots of light in this room.

I want to make sure the new color compliments other colors in my home.

I think I’ve found the perfect grey.  I’m a big fan of Benjamin Moore paints.  My dad swears by them. And their Aura line, may be on the expensive side, but it goes on beautifully and you only need one coat.  The color is called Cinder AF – 705.  I think it’s a true grey, and it’s darker then my kitchen.  I think dining rooms can be dramatic and have darker walls.  Plus you can see that this room gets a lot of light and all my built-ins are white.  I think it’s really going to make the white built-ins and trim really pop.

This is probably the fastest I’ve ever painted a room.  When Olivia is asleep, I have been working like a mad women to tape and paint as fast as possible.  I’m really excited about the change.  I’ll share pictures tomorrow.   I need to re-hang a few more pictures still.

Please share how you pick out paint colors for your home.  And what colors are you loving right now?

etc.

Pumpkin Spice Donuts

November 9, 2011

Donuts make me happy!  As a kid, my mom made donuts once in a while.  They were so amazing and now homemade donuts bring back warm memories.  Because I grew up in Papua New Guinea, donuts could not just be bought at the grocery store or bakery.  If you wanted a donut, it meant making them from scratch in hot, humid tropical weather.  Most moms wouldn’t dream of frying donuts in the heat and humidity, but my mom didn’t let that stop her. 

I like making cake donuts.  They are fast and don’t require waiting for yeast.  Here’s my donut for the fall season, Pumpkin Spice Donuts.  I made these for my kids Halloween party last week.  We used the donuts for a classic party game.  The donuts were tied to a string and the kids raced to eat the donuts without using their hands.  The holes I stuck on sticks and made Donut Pops.  

Pumpkin Spice Donuts
3 tbsp. butter (melted)
1 cup sugar
2 eggs
1/4 cup milk
2 tsp. vanilla
1 cup pumpkin puree
4 cups flour
4 tsp. cinnamon
2 tsp. ground ginger
1/4 tsp. cloves
4 tsp. baking powder
1/2 tsp. salt
In a large bowl mix the first six wet ingredients.  In another bowl, mix together the next six dry ingredients.  Pour the wet ingredients into the dry and mix until combined.  Turn dough onto a well floured surface and roll out the dough to 1″ thick.  Cut out donuts and fry in vegetable oil at 375 F.  Roll warm donuts in cinnamon sugar (1/2 cup sugar + 1 tsp. cinnamon). 

Sorry, all the donuts were eaten before I could get a picture.  Next time I make them, I’ll add a picture quickly 🙂