DIY

Dala Horse Salt Dough Ornaments

December 16, 2014

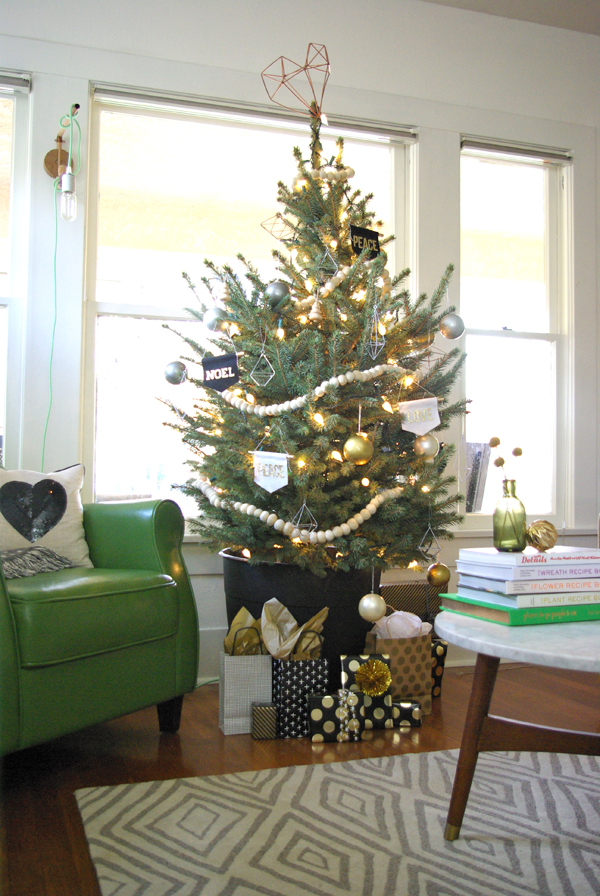
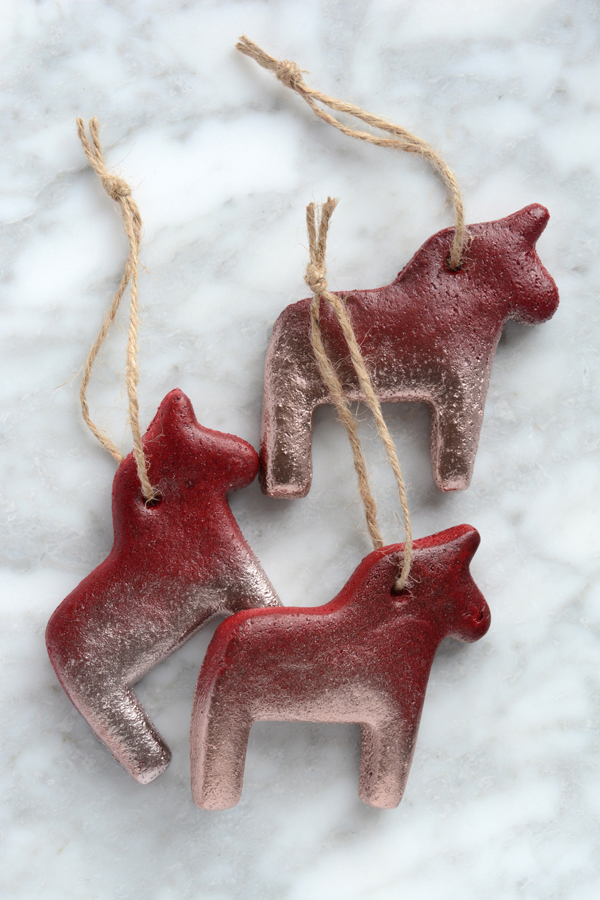
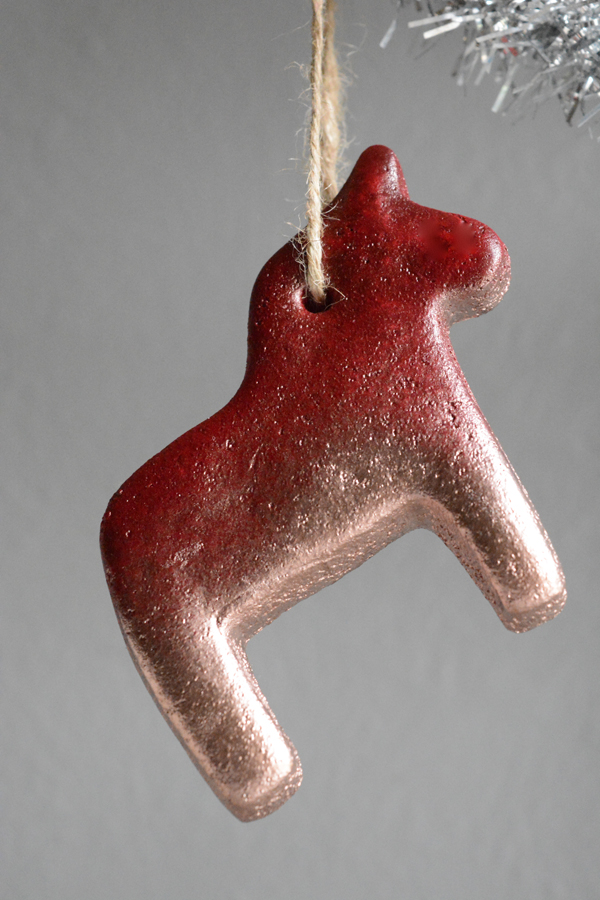
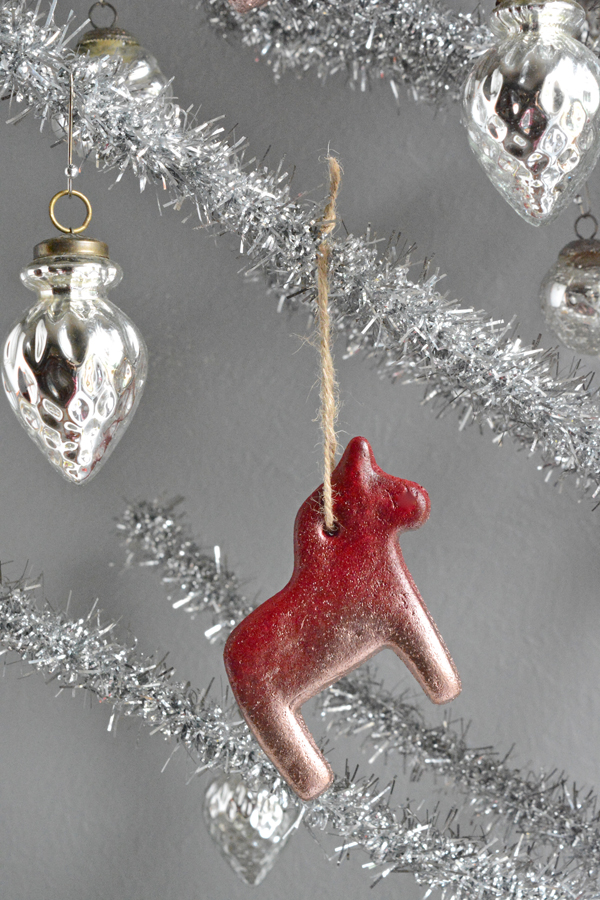
I just can’t get enough of Swedish Dala Horses.  I’ve shared before, but my Grandpa was Swedish and last year we had the privilege of getting to go to Sweden and meet some of our extended family. Christmas seems like a good excuse to bring out as many Dala Horses as possible. 
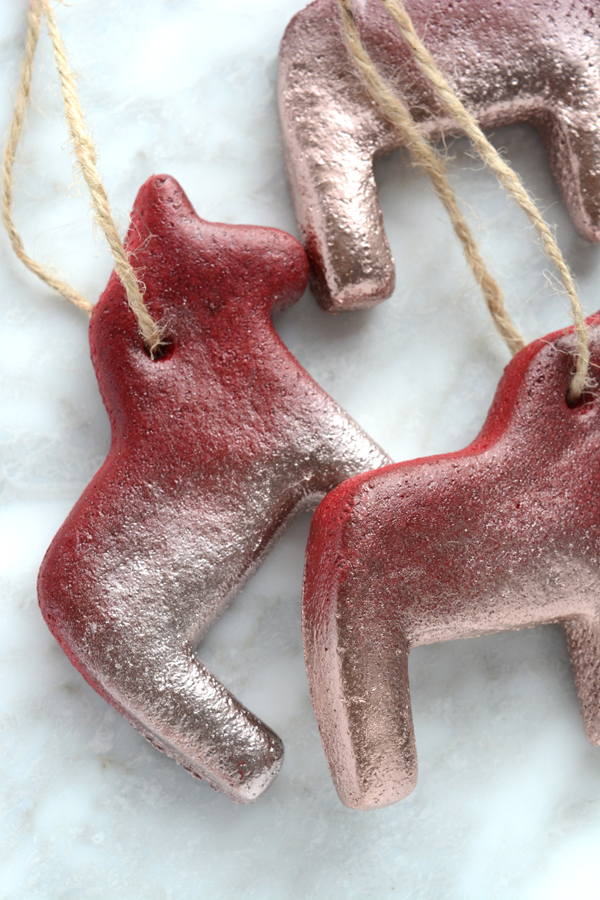
I love to find ways to make inexpensive decorations and ornaments.  Salt Dough is about as cheap as you can get.  Years ago, I made salt dough ornaments and even posted a DIY video. I decided to see if I could paint salt dough in rich colors and metallics.  I think the results look almost like ceramics, it’s hard to tell that this is just salt, flour and water.  
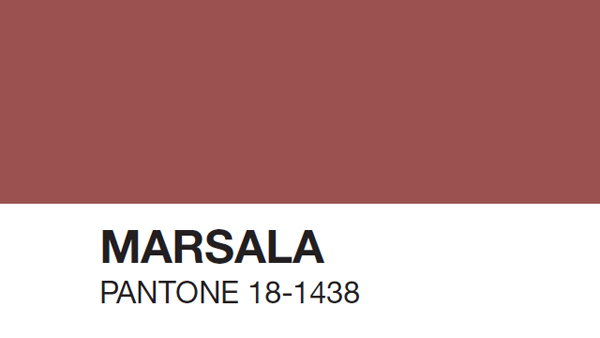
Now that Pantone has released 2015’s Color of the Year – Marsala, I’m ready to embrace it. Last year’s color was honestly not my favorite (Radiant Orchid), but this rich burgundy-ish color is right up my alley.  
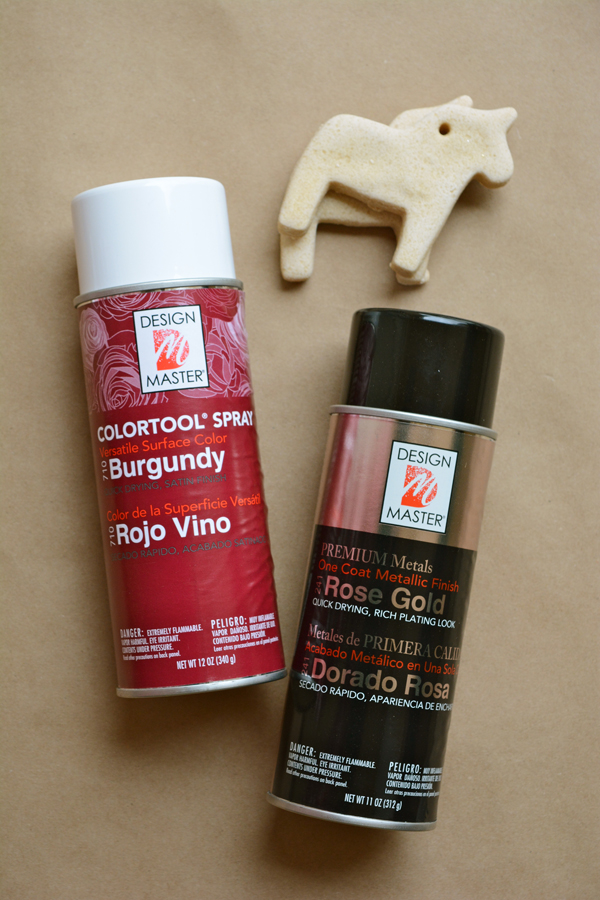
Using my favorite spray paints, Design Master, I created a ombre-like, metallic version of Marsala with Burgundy and Rose Gold.
Here’s how to make these painted salt dough ornaments:
  1. First follow the Salt Dough recipe linked above to create the shapes you want for your ornaments. I used a Dala Horse cookie cutter that we picked up in Sweden. Follow the directions for drying them thoroughly before you paint them. If the edges are a little rough, you can take a little sand paper and smooth them out.  
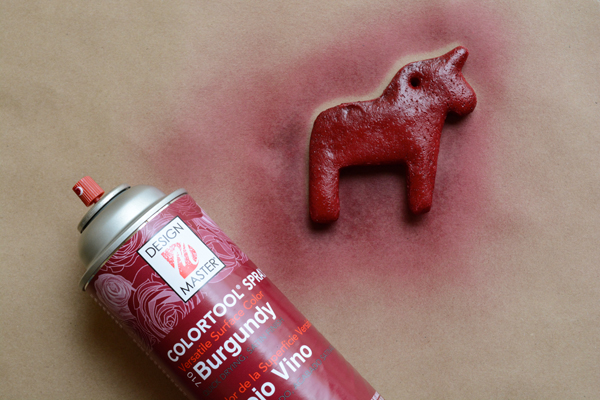
  2. Start with the solid burgundy color. Paint the back of the ornament first.  You will need to paint 2-3 coats to get a nice dark color.  Design Master paints are perfect for layering and you need only 5 minutes for drying between coats.
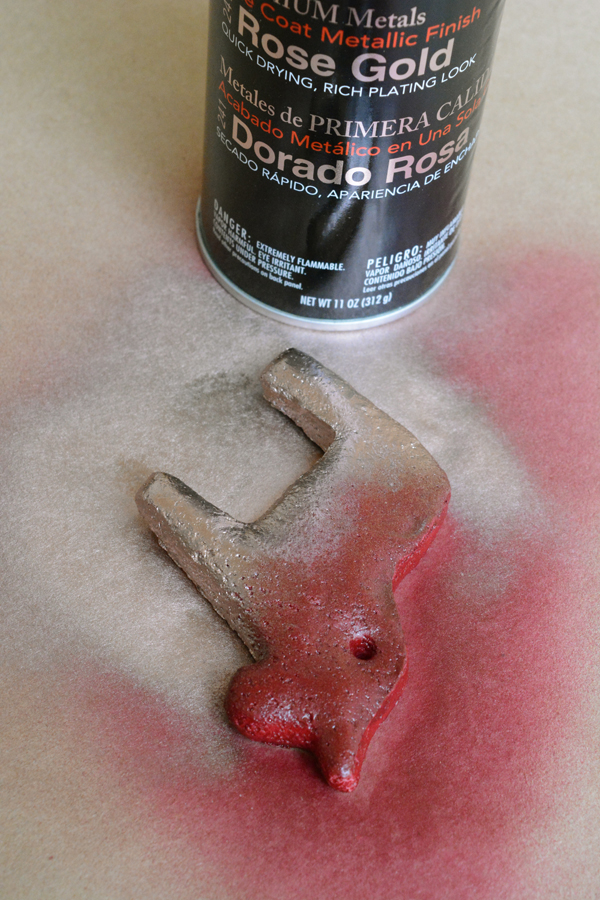
  3. Apply the Metallic Rose Gold paint to just the bottom half of the Dala Horse.  This will give the effect of ombre or metallic dipped. Spray a light coat across the bottom of the ornament. Go back and layer one more coat of the rose gold on just the feet of the Dala Horse. 
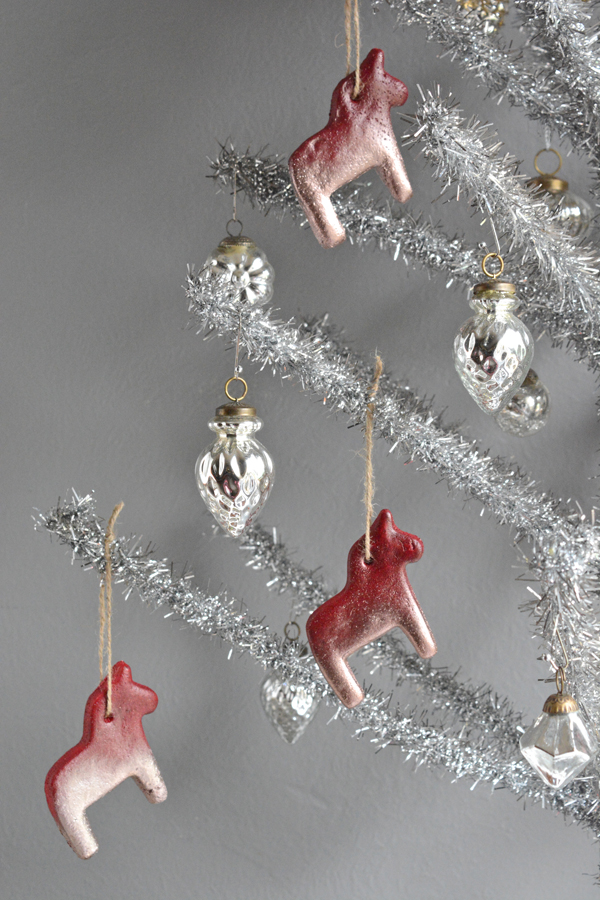
  4. When the ornaments are completely dry, thread twine or string through the hole and decorate!
The possibilities are endless. You can cut and create any shape ornament for your tree, as long as you have a cookie cutter. It’s such an inexpensive way to make custom ornaments for you tree.
Be sure to check out the some of the other fun DIYs of created using Design Master Spray Paint – DIY Faux Copper Vase, DIY Ombre Give Thanks Banner, Metallic Dipped Taper Candles, and the Gold Dipped Yarn Hanging
I buy my Design Master paints and my local Michaels and Joann Fabrics. Design Master paints can paint the most delicate of surfaces, such as silk and fresh flowers, fabric, ribbon, tulle, lace, paper, foam board and Stryrofoam TO the sturdy hard surfaces such as wood, metal, masonry, terra cotta, ceramics and plaster. Design Master is a great resource for products and ideas.  Be sure to check out all the craft and project ideas on their blog.  

This post is sponsored by Design Master. All opinions are my own. Thank you for supporting the brands that make this blog possible. 

Food & Drink

Candy Cane Brownies

If you are curious to see how far my blog has come.  You can look back at this post from 4 years ago to just see how much better my photography has gotten at least.  I’ve updated the recipe a little bit, and I think they are even better now.  I’m using my mom’s Chewy Brownie recipe that she’s made most of my life.  Why change a tried and true recipe?

I love this holiday take on a classic American dessert. Who doesn’t love a chewy, decadent brownie, and topped with Candy Canes, they are even better.

Chewy Brownies
2 cups sugar
1 cup cocoa
1/2 cup butter
4 eggs
2 tsp. vanilla or peppermint extract
1 cup flour

In a medium sized pan, melt the butter over medium high heat.  Remove the pan from the heat and mix in the sugar and cocoa well.  In another bowl, beat the eggs and then add them to the butter, sugar and cocoa mixture.  When the eggs are mixed in well, add the vanilla and the flour and stir until the batter is smooth.

Pour the batter into a greased 9X13″ pan.  Bake at 325F for about 25-30 mins, or till the tops of the brownies are shiny.

Fudge Icing
1/4 cup butter
1 teaspoon vanilla
1/4 cup cream or half and half
3 tbsp. cocoa
2 1/4 cups powdered sugar

Crushed candy canes or peppermints

In a small pan, melt the butter, cocoa and cream.  Whisk together until there is no lumps of cocoa. Remove from the heat and add the vanilla and then the powdered sugar. Whisk by hand until smooth. Pour the icing over the warm brownies. Sprinkle crushed candy cane pieces on the freshly iced brownies.  Allow the brownies to cool before cutting.

If you have a Christmas party or get together that requires you bringing a treat, why not bake a pan of these?  I bet you have most of the ingredients already.

And the winner of the Cricut Explore Machine is……….

Kim Coers – she won by following Oleander and Palm on Pinterest.  Check your email Kim!!! Congratulations!

etc.

14 days of LOVE – Cricut Explore Giveaway!

December 11, 2014

Yep, you read that right, today I’m giving away Cricut Explore Machine!!!!!  I’m a huge Cricut fan. I had a Cricut way before I was a blogger. I use it often and for so many different things. And no, I’m not a scrapbooker, my Cricut helps me DIY with polished, professional results every time.

I love giving gifts that have a little personal touch to them.  I cut simple His and Hers out of white vinyl (this is the permanent stuff, I buy it from a local sign company), and then stuck them on insulated thermoses that I found at IKEA.  I think this is a pretty fun gift to give a couple you love. 
I’m giving you a couple ways to enter.  Fill out the rafflecopter below:

This giveaway is open to US residents only.

 We sure hope you have enjoyed this Holiday edition of 14 Days of LOVE. We love our readers, thank you for faithfully following through good posts and bad. Your support is what keeps us going.

DIY

Christmas Buntings

December 10, 2014

I’ve been having a lot of fun with my Cricut Explore machine lately.  I’ve made a bunch of fun stuff for the Christmas with it.  I’ve got Christmas buntings coming out of my ears actually.  I love that this machine can cut through thick glittered card stock with precision.  If you like these buntings, I’m having a little Instagram sale, check out this post if you’d like to order one.  

I also wanted to remind you that tomorrow is the last day of our 14 Days of Love Giveaway and I’m giving away a Cricut Explore Machine!!!!  So be sure to come back tomorrow and enter.

DIY / etc.

Colorado Blue Spruce Potted Christmas Tree

December 8, 2014

If I have the choice, it’s always for a live Christmas tree.  Nothing beats the smell and look of a real one. But, when we lived in Papua New Guinea and Yemen, a little fake one had to make do, but honestly, it’s just not the same.

Since we hope this little guy will be apart of our family Christmas’s for many years to come, we decided to name him. Please meet ‘Bruce the Spruce’.  I told you last week that I’d share a little more about our Christmas tree this year and how we are caring for it. We decided to try a potted Christmas tree.  The hope is that we will get to use the same tree for a few years in a row.  Each Christmas we will bring the tree inside, but the rest of the year, it will live outside in a shady part of our yard.  It was not easy to find a live evergreen here in Bakersfield.  But, the only nursery in town to carry some had a couple varieties of Colorado Blue Spruce. I love the color of it’s needles.  They are a gorgeous silvery, muted green.

I bought the tree in what they call “Ball and Burlap”, which just means the root ball in contained in burlap.  This tree is a 4-5 ft. tree and cost about $70, which isn’t much more then a cut tree in Southern California.

I found a large enough pot and Home Depot for just $14.99, it’s black plastic, but the price was right and I think it looks pretty sharp.  I really didn’t want a ceramic pot that would just add more weight to this already VERY heavy tree.  With both Lon and I and the help of a skateboard, we barely got it in the house. That root ball is like solid cement.

Keep reading for potting and care instructions.

Ok, so here’s a little instruction on potting and caring. First, find a large enough pot for the tree. Peel back the burlap around the base of the trunk to expose the soil, but don’t remove the burlap from the sides and base of the ball. Place the root ball in the pot and fill in the pot with good potting soil. Water the tree with ice, this will help keep the tree cooler while it’s inside and allow it to be watered over time. I’ve found that the first couple of days the tree took about 4 cups ice everyday, and now that the tree is 3 1/2 weeks in the hour, it seems to only be needing about 4 cups of ice every other day. The folks at my local nursery said to just watch if the tree starting dropping a lot of needles. Sometimes this can mean that the tree is too warm or needs more water.  So far, Bruce is happy. Fingers crossed that we can keep him alive. 

I decorated the tree with some of my old favorites and added the mini pendant ornaments and a few new pieces from The Land of Nod.

What kind of tree do you have this year? Are you a live or fake tree family?

etc.

Friday’s Fabulous 5 – Modern Christmas Cheer

December 6, 2014

Have you decorated your home for Christmas yet?  I’m just about done, but it’s always nice to find new inspiration.  I’m sharing 5 modern, fresh Christmas ideas from some of my favorite bloggers.  

I hope you have a great weekend.  We were supposed to go camping with Lon’s ecology club, but Olivia ended up getting really sick.  So I’ve been home all day and have accomplished hardly anything at all.  But, the weekend is young.  I’m looking forward to having a couple days at home with my kiddos, sick or not.

DIY / etc.

Mini Pendant Christmas Ornaments

December 2, 2014

I’m over on Honest to Nod, The Land of Nod’s blog, sharing these cute Mini Pendant Ornaments.  I made quite a few of these for our Christmas tree this year.  I can’t get enough of hanging things, whether it’s yarn or felt, I love the versatility and cost effectiveness of these materials.  
I’ll share more about our potted blue spruce Christmas tree soon, but I decorated Bruce (yes, we named him) with metallics and black and whites.  It’s simple and sparkly, but just the way I like it.  
Have you made anything for Christmas decor this year?  Do you put up the same decorations year after year, or do you change it up from time to time?  

etc. / Style

14 Days of Holiday Love – Sven Clog Giveaway!

Yippee! Day 5 of our giveaway is here. And that means you can enter to win a pair of Sven Clogs!

I’m a huge fan of Sven Clogs, and this holiday season my girls and I are matching with Bronze clogs. Denali and I have Bronze Bow Tie Peep Toe Clogs and Olivia has Bronze Side Slit Clogs.  They look great with everything!

I’ve got 5 ways for you to enter:

1. Visit the 14 Days of LOVE giveaway Facebook page

2. Follow @svenclogs on instagram.

3. Follow @oleanderandpalm on instagram.
4. Share a pick of Sven Clogs on instagram and be sure to mention the giveaway and @oleanderandpalm and @svenclogs. (You can just repost my instagram image) This entry will count for 2 entries.
5. Visit Sven Clogs on Facebook


Let me know you entered by filling out the rafflecopter entry below.

a Rafflecopter giveaway

Design

Coffee Table Styling

November 30, 2014

I’m partnering with Glade to bring you this post.  Thank you for supporting the companies that help make this blog, Oleander and Palm, possible
I love to accessorize and change up my decor often. I’m not talking about going and buying a whole bunch of new stuff, just rearranging and grouping things I already own.  My coffee table top is one place I love to display treasures and favorite items. Now that Olivia is old enough to not be messing with my stuff as much, I can put out my favorite candle and special trinkets. It’s fun to add personality to my space and give it a little of my own flavor. I want guests to feel comfortable and maybe even a little inspired in my home.
I’ve styled my coffee table 3 ways with items I already own. I love to start with a tray or plate as a base and then style it with a Glade Clean Linen Jar Candle paired with a few objects that vary in size and shape. This Clean Linen candle has notes of watery melon and clean, crisp air with sparkling citrus blends. It’s a fresh, bright scent that works for every season. It fills the room with a light, clean feeling. 
1.  I used a Papua New Guinea basket as a base and topped it with one of my father-in-law’s cut and polished rocks, painted pom pom flowers and a thrifted brass quail.  

2.  I used a graphic black and white platter and added a small antler, a mini potted fiddle leaf fig, and my favorite white ceramic fox (that I got at Target a couple years ago).

3.  I started with an inexpensive silver charger from the dollar store and then add a couple mushrooms and my little squirrel light.

Which coffee table look do you like best?

Oh, and be sure to check out Glade’s Pinterest page, it’s packed with inspiration for creating cozy and inviting spaces.  

Style

Mad About Plaid

November 29, 2014

Well, Happy Thanksgiving friends.  We are in Idaho enjoying some time with Lon’s family.  I’ve definitely eaten way too much, so tomorrow I’m staring the day with a long walk.  It’s fun to visit cooler weather and have an excuse to wear plaid and layer up.  I told you I’m loving plaid lately.  So I had to find plaid for the kids. 
I’ve recently been so aware of how quickly my kids are growing.  Denali is all of a sudden taller then me, Dylan is quickly out growing everything he owns and Olivia just isn’t my baby any more.  I know I won’t regret taking too many pictures of my kids.  So, for now I’m freezing this moment in time.  In the hustle and bustle of life and all the things that are piling on my plate, I don’t want to wish these years away. I want to enjoy every minute I have with these kiddos of mine. 

I found these shirts for Denali and Olivia and this sweater for Dylan layered with a plaid shirt (similar to this one).


Thanks P.S. from Aeropostle for providing paid shirts for my kiddos this Winter.